Crochet isn’t just for blankets, scarves, and granny squares. Sometimes the smallest projects are the most fun, especially when they turn a few basic stitches into something completely unexpected.
These little crochet math symbols are a perfect example.
With a small amount of cotton yarn and a crochet hook, you can make your own plus sign, minus sign, multiplication sign, equals sign, and division sign. They’re cute, practical, and surprisingly easy to crochet.
Use them to decorate a school-themed tote bag, personalize a pencil pouch, make educational wall decorations, or create colorful counting activities for a classroom.
And the best part? You don’t need to know complicated crochet stitches.
This beginner-friendly crochet math symbol applique pattern uses simple chains and single crochet stitches. You’ll learn how to make narrow crochet strips, arrange them into recognizable mathematical symbols, and sew the pieces together neatly.
We’ll start with one basic shape and use it to create five different symbols.
What You’ll Learn
By the end of this tutorial, you’ll know how to:
- Crochet a narrow, straight strip using single crochet stitches.
- Make a crochet plus sign with two crossing strips.
- Create matching minus and equals signs.
- Arrange crochet pieces diagonally for a multiplication sign.
- Crochet two small circular dots for a division sign.
- Secure overlapping crochet pieces without bulky seams.
- Attach finished appliques to bags, blankets, or fabric projects.
The project is suitable for beginners who already know how to make a chain and a single crochet stitch. If you’re still learning those stitches, the instructions below will help you practice.
Materials You’ll Need
You only need a few basic crochet supplies.
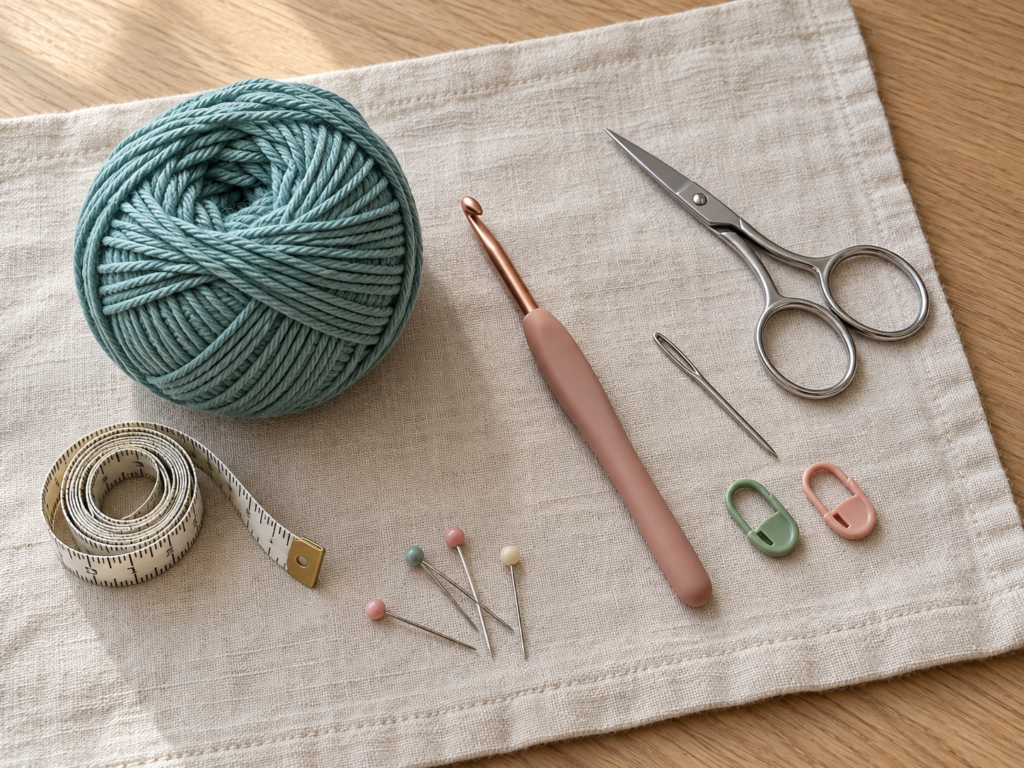
Yarn: DK-weight cotton yarn (category 3). Smooth cotton is a good choice because it makes the stitches easy to see and helps small appliques hold their shape.
For this tutorial, we’ll use dusty teal cotton yarn. You can choose any color you like, including bright classroom colors or soft pastels.
Crochet hook: 3.5 mm (US E/4). A slightly smaller hook than the yarn label recommends can help create compact, well-defined stitches.
Other supplies: Small scissors, a blunt yarn needle, stitch markers if needed, and a measuring tape. Keep a piece of cotton fabric or a finished crochet project nearby if you plan to sew the appliques onto something.
You only need a small quantity of yarn. This is a useful project for leftover cotton from other crochet makes.
Crochet Abbreviations Used
This pattern is written in US crochet terminology.
| Abbreviation | Meaning |
|---|---|
| ch | Chain |
| sc | Single crochet |
| sl st | Slip stitch |
| st / sts | Stitch / stitches |
| rep | Repeat |
| RS | Right side |
| WS | Wrong side |
A US single crochet is called a double crochet in UK terminology. Follow the US stitch definitions throughout this pattern to avoid confusion.
Quick stitch refresher
To make a chain, yarn over your hook and pull the yarn through the loop already on the hook.
To make a single crochet, insert your hook into the indicated stitch, yarn over, and pull up a loop. You should now have two loops on your hook. Yarn over again and pull through both loops.
To make a slip stitch, insert the hook into the indicated stitch, yarn over, and pull the yarn through the stitch and the loop on your hook in one movement.
Those three stitches are all you need for this project.
Before You Start
Understand the basic construction
Instead of learning a completely different pattern for every mathematical symbol, we’re going to crochet small rectangular strips.
Each strip will be the same size.
We’ll use one strip for a minus sign, two parallel strips for an equals sign, two perpendicular strips for a plus sign, and two diagonal strips for multiplication.
For division, we’ll combine one strip with two small crocheted circles.
This modular construction is particularly beginner-friendly because you can practice one simple rectangle and repeat it.
Gauge and finished size
Gauge isn’t critical for decorative appliques, but consistent tension is important if you want all five symbols to look like a matching set.
With DK cotton yarn and a 3.5 mm hook, the strips may measure approximately 7–9 cm long. The exact measurement depends on your yarn and individual tension.
Try to make all your strips the same length and width.
How to keep your crochet edges straight
The easiest way to keep a small crochet rectangle straight is to count your stitches at the end of every row.
In this tutorial, every full row of a bar should have 15 single crochet stitches.
Remember that the turning chain does not count as a stitch.
If your rectangle starts getting wider or narrower, check the first and last stitches before continuing.
Choosing colors
A single-color set looks neat and coordinated. Dusty teal, sage green, mustard yellow, and terracotta are lovely choices.
For a colorful classroom project, you can make each symbol a different color.
If you’re sewing the appliques onto a bag or blanket, choose a yarn color that contrasts with the background so the symbols are easy to recognize.
Step-by-Step Crochet Math Symbol Tutorial
Step 1: Make the foundation chain
We’ll begin by crocheting the first narrow strip.
Make a slip knot and place it on your 3.5 mm hook.
Now chain 16.
Keep the chain relaxed rather than pulling every stitch tightly. You should be able to see the individual V shapes along the foundation chain.
When you’ve finished, count the chains carefully.
You should have exactly 16 chains, not including the slip knot or the working loop on your hook.
Beginner tip: If you tend to crochet tight foundation chains, use a slightly larger hook just for the chain, then switch back to your 3.5 mm hook.
Common mistake to avoid: Don’t count the loop currently on your hook as an extra chain. That loop is part of your working stitch.
Step 2: Crochet the first row
Now we’ll turn the foundation chain into a solid strip of crochet fabric.
Insert your hook into the second chain from the hook.
Work one single crochet into that chain.
Continue making one single crochet in each remaining chain across the foundation.
When you reach the end, count your stitches.
Row 1: Sc in the second ch from hook and in each ch across. (15 sc)
You should now have a neat row of 15 single crochet stitches.
Don’t worry if the row curls slightly. Foundation chains often feel tighter than the stitches worked above them.
Beginner tip: Look for the two loops forming a V at the top of each stitch. These will help you identify where to insert your hook in the next row.
Common mistake to avoid: Skipping a foundation chain will leave your strip shorter than the others. Count all 15 stitches before continuing.
Step 3: Complete the narrow crochet strip
Once you’ve finished the first row, chain 1 and turn your work.
The chain 1 helps bring the yarn to the correct height for the next row. It does not count as a stitch.
Work one single crochet into each of the 15 stitches across.
Repeat once more to create a third row.
Row 2: Ch 1, turn, sc in each st across. (15 sc)
Row 3: Ch 1, turn, sc in each st across. (15 sc)
After Row 3, fasten off, leaving a yarn tail long enough for sewing if the strip will be joined to another piece.
You should now have a small rectangular bar.
Lay it flat on your work surface. The two long edges should be reasonably straight, and the short ends should have similar widths.
This simple rectangle is the foundation of almost every symbol in our set.
Beginner tip: If your strip curls, gently smooth it with your fingers. You can block it later if needed.
Common mistake to avoid: Don’t crochet into the turning chain at the end of a row. Doing so may accidentally increase the stitch count.
Step 4: Make the remaining crochet bars
Now that you know how to make one strip, repeat the same instructions until you have eight matching bars.
Each bar follows the same simple pattern:
- Foundation: Ch 16.
- Row 1: Sc in second ch from hook and across. (15 sc)
- Rows 2–3: Ch 1, turn, sc in each st. (15 sc)
- Fasten off.
You need eight bars for the complete five-symbol set: two for addition, one for subtraction, two for equals, two for multiplication, and one for division.
Lay all eight strips next to one another and compare their lengths.
If one is noticeably longer, check whether you accidentally added a stitch or used looser tension.
Beginner tip: Make all the strips before assembling the symbols. This helps you establish a comfortable rhythm and makes it easier to keep the finished set consistent.
Step 5: Arrange the crochet plus sign (+)
The plus sign is one of the easiest math symbols to assemble.
Take two matching crochet strips.
Place the first strip vertically on your work surface.
Position the second strip horizontally across the middle of the first strip.
The two pieces should form a plus sign with four balanced arms.
Move the horizontal strip until the left and right arms look equal. Then check that the top and bottom arms are approximately the same length.
You can use the middle stitch of each bar as a guide. Since each strip contains 15 stitches across, the eighth stitch marks its approximate lengthwise center.
Beginner tip: Use a removable stitch marker or a small pin through the central overlap to keep the pieces in place while you check their alignment.
Common mistake to avoid: If one arm is much longer than the others, the finished plus sign may resemble a cross rather than a mathematical addition symbol.
Step 6: Sew the plus sign together
Once you’re happy with the position, thread a yarn needle with one of the long yarn tails.
Carefully sew through the overlapping center of both crochet strips.
Make several small stitches, catching both layers securely without pulling the yarn too tightly.
Try to keep your stitches hidden between the crochet loops.
Turn the applique over and secure the yarn on the back.
Weave the remaining tail through several stitches before trimming it.
Your plus sign should now hold its shape when lifted.
If the arms move or twist, add another small securing stitch at the center.
Beginner tip: Matching yarn makes the join less noticeable. Use the same dusty teal yarn rather than a contrasting sewing thread.
Common mistake to avoid: Pulling the sewing yarn too tightly can bunch the center. Keep the intersection flat and secure rather than compressed.
Step 7: Make the minus sign (−) and equals sign (=)
Now for two symbols that are even easier.
Crochet minus sign
Take one of your completed rectangular strips.
Lay it horizontally.
That’s your minus sign!
If you’re attaching it to a fabric project, you can sew around the outer edge to hold it in place.
Crochet equals sign
Take two matching strips and lay them horizontally, one above the other.
Leave a small, even gap between them.
The two bars should be parallel and aligned at both ends.
A useful starting point is to make the gap approximately the width of one crochet bar, then adjust it until the symbol looks balanced.
Because the equals sign consists of two separate pieces, it needs to be attached to a shared backing if you want to move it around as one applique.
Beginner tip: Use a measuring tape to check that both bars are the same length and that the space between them is consistent.
Common mistake to avoid: Placing the bars too close together can make the equals sign look like one thick stripe.
Step 8: Make the multiplication sign (×)
The multiplication symbol uses the same construction method as the plus sign, but the strips are arranged diagonally.
Take two matching crochet bars.
Place the first strip diagonally from the upper left toward the lower right.
Lay the second strip across it from the upper right toward the lower left.
The strips should intersect at their centers, forming an X.
Adjust the angle until all four arms look balanced.
For a familiar multiplication symbol, aim for diagonals that are approximately perpendicular.
Once the shape looks correct, thread your yarn needle and sew the center securely, just as you did with the plus sign.
Weave the ends into the back of the crochet fabric.
Beginner tip: Arrange the strips on a flat surface before sewing. It is much easier to correct the angle before the pieces are attached.
Common mistake to avoid: If the strips cross too close to one end, the X will look uneven. Always check the center before stitching.
Step 9: Crochet two small dots for division
The division sign is slightly different because it includes two small circular pieces.
Don’t worry — these dots are simple to make.
Start with a slip knot.
Chain 2.
Work 6 single crochet stitches into the second chain from your hook.
As you make the stitches, they will gather into a small circular shape.
Slip stitch into the first single crochet to close the circle.
Fasten off, leaving a yarn tail for attaching the dot later.
Make a second dot using exactly the same instructions.
Dot pattern:
- Ch 2.
- Work 6 sc into the second ch from hook.
- Sl st into the first sc.
- Fasten off.
Each dot should have six single crochet stitches.
If you want larger dots, you can work a second round with two single crochet stitches in each stitch, giving you 12 stitches. Make sure both dots have the same number of rounds.
Beginner tip: Use the same hook and yarn for both dots. This makes it easier to achieve matching sizes.
Common mistake to avoid: Don’t confuse the working loop with a stitch when counting the six single crochets.
Step 10: Assemble the division sign (÷)
Take one completed crochet bar and lay it horizontally.
Position one small crochet dot above the center of the bar.
Place the second dot directly below the center.
Adjust the spacing until the division sign looks balanced.
The two dots should line up vertically, with the horizontal bar centered between them.
For a permanent applique, sew all three pieces directly onto the same fabric backing.
If you want a removable classroom symbol, attach the pieces to a small felt or fabric patch first.
Use the yarn tails to sew the dots securely. Try to hide the stitches underneath each circular piece.
Beginner tip: Lay all three components on the backing before sewing any of them down. This lets you check the spacing.
Common mistake to avoid: Off-center dots can make the division symbol difficult to recognize. Use the midpoint of the bar as your guide.
Pattern Notes and Stitch Counts
Before moving on to finishing, here are a few useful details to remember.
Turning chains: The chain 1 at the beginning of Rows 2 and 3 does not count as a stitch.
Stitch count: Each crochet bar has 15 single crochet stitches per row and three rows in total.
Repeat pattern: Repeat the same bar instructions eight times for a full five-symbol set.
Right side and wrong side: These single crochet rectangles are fairly reversible. Choose the side with the neatest appearance as the front.
Dot stitch count: Each division dot begins with six single crochet stitches.
Size adjustment: To make a longer symbol, increase the foundation chain count. To make a thicker bar, add more single crochet rows.
Try to adjust every bar in the same way if you want a coordinated set.
Common Beginner Mistakes and How to Fix Them
Even simple crochet appliques can look uneven when the stitch count or tension changes. Here are some common problems and easy ways to correct them.
1. The crochet strips have uneven edges
This usually happens when you accidentally miss the final stitch or work into the turning chain.
Fix: Count 15 stitches at the end of every row. Use a stitch marker in the first and last stitches if needed.
2. One strip is longer than the others
You may have used a different foundation-chain count or changed your tension.
Fix: Compare each completed strip with your first one. If the difference is noticeable, remake the uneven strip before assembling the symbol.
3. The plus sign looks crooked
The strips may not be crossing at their centers.
Fix: Find the approximate midpoint of each strip, then reposition them before sewing.
4. The equals sign looks too crowded
If the two bars are too close together, they may look like one wide rectangle.
Fix: Increase the gap until both horizontal bars are clearly visible.
5. The division dots are different sizes
One dot may have an extra stitch or a second round that the other does not.
Fix: Count the stitches in each dot and use the same construction method for both.
6. The crochet pieces curl
Tight tension, a tight foundation chain, or uneven row tension can make narrow strips curl.
Fix: Gently block the pieces according to the yarn’s care instructions. For future strips, try a slightly larger hook if your stitches are very tight.
7. The center of the plus sign is bulky
This can happen when the sewing stitches are pulled too tightly or too many stitches are placed in one spot.
Fix: Use a few small, evenly distributed stitches to secure the overlap rather than repeatedly sewing through the exact same point.
How to Customize Your Crochet Math Symbols
Once you’ve made your first set, you can easily change the size, color, and appearance.
Try different yarn colors
Make each mathematical symbol a different color for a cheerful classroom theme.
For example, you could crochet a mustard yellow plus sign, a terracotta minus sign, a sage green equals sign, and a dusty blue multiplication sign.
If you prefer a minimalist look, make all the symbols in one neutral shade.
Change the size
For smaller appliques, try sport-weight cotton yarn and a smaller hook.
For larger classroom decorations, use worsted-weight yarn and a larger hook.
You can also make longer strips by increasing the foundation chain count. Just remember to use the same count for all matching bars.
Add a border
A narrow single crochet edging can give each bar a slightly more finished appearance.
However, borders also make the bars thicker. If you add an edging, work it consistently on every piece before assembling the symbols.
For very small appliques, leaving the edges plain often gives the cleanest result.
Make educational decorations
These crochet symbols work especially well with crocheted or fabric numbers.
You could create simple addition and subtraction displays, decorate a classroom bulletin board, or make a personalized math-themed wall hanging.
Decorate accessories
Try sewing the appliques onto a pencil pouch, cotton tote bag, notebook cover, or handmade blanket.
They can also make cute embellishments for teacher appreciation gifts or back-to-school crafts.
For children’s learning materials, attach all components securely to a suitable backing and inspect the finished item regularly. Avoid leaving small detachable crochet pieces with children who may put them in their mouths.
Finishing Instructions
Your crochet math symbols are nearly ready to use.
Fasten off neatly
After completing each piece, cut the working yarn, leaving a tail long enough for finishing.
Pull the tail through the final loop and tighten gently.
Avoid pulling so tightly that the last stitch becomes distorted.
Weave in the yarn ends
Thread a blunt yarn needle with the yarn tail.
On the wrong side of the crochet fabric, weave the tail through several stitches.
Change direction once if possible to help secure the yarn.
Trim the excess yarn carefully.
If you’re using the tail to sew the applique onto another project, keep it until after attachment.
Block the appliques
If your symbols curl or twist, you can gently wet-block them.
Lightly dampen the cotton crochet pieces and lay them flat on a clean towel or blocking mat.
Shape the bars into straight lines and allow them to dry completely.
Avoid stretching the pieces so much that the stitches become distorted.
Always follow the yarn manufacturer’s care instructions.
Sew the appliques onto fabric
Place the completed symbol on your chosen fabric.
Use matching yarn or suitable sewing thread and a needle to secure the outer edges.
Make small stitches through the crochet fabric and backing, keeping the front as neat as possible.
For a plus or multiplication sign, secure the central intersection as well as the arms where needed.
For equals and division signs, attach every separate component to the backing so the symbol remains correctly aligned.
Check that the fabric lies flat before tying off your sewing thread.
Quick Printable-Style Pattern Summary
Crochet Math Symbol Applique Pattern
BeginnerYarn
DK cottonHook
3.5 mmStitches
ch, sc, sl stTerminology
US crochet
Basic crochet bar
Foundation: Ch 16.
Row 1: Sc in second ch from hook and across. (15 sc)
Rows 2–3: Ch 1, turn, sc in each st. (15 sc)
Fasten off.
Symbol assembly
| Symbol | Components |
|---|---|
| Plus (+) | 2 perpendicular bars |
| Minus (−) | 1 horizontal bar |
| Equals (=) | 2 parallel bars |
| Multiply (×) | 2 diagonal bars |
| Divide (÷) | 1 horizontal bar + 2 dots |
Division dot: Ch 2, work 6 sc in second ch from hook, sl st to first sc, fasten off. Make two.
Finishing: Sew overlapping pieces together, weave in ends, block if needed, and attach separate components to a backing. Copy printable pattern
Frequently Asked Questions
1. Are crochet math symbol appliques beginner-friendly?
Yes. This pattern is suitable for beginners who can make a foundation chain and single crochet stitches.
The basic construction uses narrow rectangular strips, so you don’t need to learn complicated increases, decreases, or shaping techniques.
The most important skills are counting stitches and keeping your tension consistent.
2. What yarn is best for crochet math symbols?
Smooth cotton yarn is a good choice because it produces clear stitch definition and relatively firm fabric.
DK cotton works well for small decorative appliques.
You can also use worsted-weight cotton for larger symbols or thinner cotton yarn for smaller embellishments.
Choose a hook that creates firm stitches without making the fabric too stiff.
3. How do I make a crochet plus sign?
Crochet two matching rectangular strips.
Place one vertically and the other horizontally so they cross at the center.
Adjust the position until all four arms look balanced.
Then sew the overlapping center securely with matching yarn.
4. Can I make these math symbols bigger?
Yes. You can use thicker yarn, a larger hook, or increase the number of foundation chains.
For a larger and more substantial applique, you may also want to add extra rows to each bar.
Keep all matching strips the same size so the symbols look consistent.
5. How do I stop crochet appliques from curling?
Start by checking your tension. Very tight foundation chains can cause narrow strips to curl.
Try crocheting the foundation chain a little more loosely or using a slightly larger hook for the starting chain.
You can also gently block the finished cotton pieces to help them lie flat.
6. Can I sew crochet math symbols onto a blanket or bag?
Absolutely. These flat crochet appliques can be attached to cotton bags, crochet blankets, fabric accessories, and other suitable surfaces.
Use a yarn needle and matching yarn or sewing thread to secure the edges.
Make sure all separate pieces are attached firmly, especially the two dots of the division sign.
7. Can I use these appliques for educational activities?
Yes. Crochet math symbols can be useful for handmade classroom decorations, number displays, and supervised learning activities.
You could pair them with crocheted numbers to create simple equations.
For movable educational pieces, attach the symbols to sturdy fabric cards rather than leaving small components loose.
Finished Crochet Math Symbol Appliques
Once you’ve completed all five symbols, lay them out together.
You should have a plus sign, minus sign, equals sign, multiplication sign, and division sign.
Check that the bars are similar in thickness and that the pieces are aligned neatly.
A matching set looks especially lovely when every symbol is made from the same yarn.
Conclusion
These little crochet math symbols prove that even the simplest stitches can turn into something creative.
Once you’ve mastered the basic rectangular bar, you can make an entire set of mathematical signs using just a few repeated steps.
Try making a matching set for a school-themed tote bag, a classroom decoration, or a handmade educational project.
And if you enjoyed this tutorial, save it to your favorite crochet Pinterest board so you can come back whenever you need a quick and easy applique idea.