There is something especially cheerful about a handmade sunflower. The warm yellow petals, rich brown center, and little green leaves make it one of those crochet projects that instantly brightens a room.
And the lovely thing about making a crochet sunflower? You don’t need to be an expert to create one.
This easy crochet sunflower pattern uses a simple circular center and a repeating petal design. You’ll start with basic single crochet stitches, build a neat round flower center, and then create a ring of golden-yellow petals using a few taller stitches.
I’ve designed this tutorial to help newer crocheters understand not just what to crochet, but where each stitch goes and why it matters.
You can leave your sunflower as a decorative crochet appliqué, add it to a tote bag, or attach a green stem to create a flower that looks beautiful in a small vase. The slightly padded version makes a particularly charming handmade decoration.
The instructions below use US crochet terminology, and every major stage includes an image placement to guide you from your first stitch to the finished flower.
What You’ll Learn
By the end of this tutorial, you’ll know how to:
- Make a crochet magic ring and close it neatly.
- Increase single crochet stitches to create a circular flower center.
- Count stitches and keep a flat crochet circle from curling.
- Crochet simple pointed sunflower petals.
- Join two crochet circles while working the flower’s outer edge.
- Add a little stuffing for gentle dimension.
- Make a small green leaf and optional wrapped stem.
- Fasten off, hide yarn tails, and shape your finished sunflower.
This tutorial is also a helpful introduction to crocheting small motifs that you can use on blankets, headbands, bags, and other handmade projects.
Materials You’ll Need
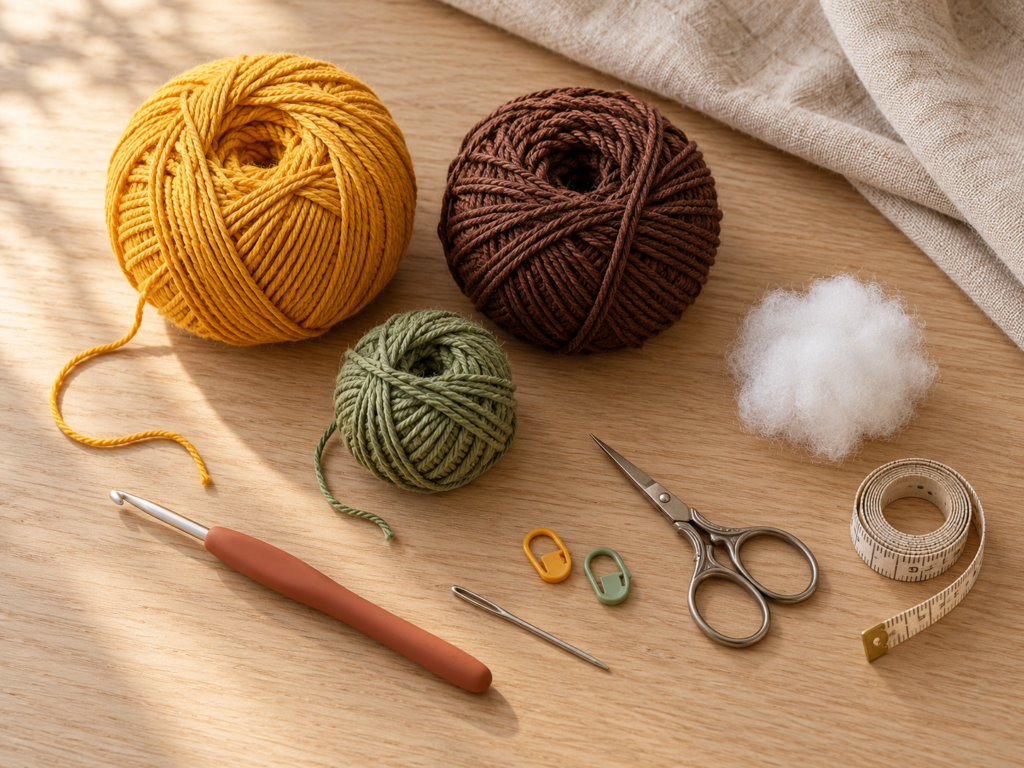
You won’t need much yarn to crochet one sunflower. Small leftover balls from another project are often enough.
| Material | Recommendation |
|---|---|
| Yellow yarn | Golden-yellow DK cotton for petals |
| Brown yarn | Cocoa-brown DK cotton for the flower center |
| Green yarn | Muted sage-green DK cotton for the backing, leaf and stem |
| Crochet hook | 3.5 mm |
| Scissors | Small, sharp craft scissors |
| Yarn needle | Blunt-tipped tapestry needle |
| Stitch marker | One or two removable markers |
| Fiberfill | Small amount, optional |
| Wooden dowel | Optional, for a stemmed flower |
| Measuring tape | Optional, for consistent sizing |
I recommend cotton yarn because it gives the petals a defined shape and makes individual stitches easier to see.
Acrylic yarn can work, too, but softer acrylic may produce petals that are a little more flexible.
Crochet Abbreviations Used
This pattern uses US crochet terminology throughout.
| Abbreviation | Meaning |
|---|---|
| ch | Chain |
| sc | Single crochet |
| hdc | Half double crochet |
| dc | Double crochet |
| tr | Treble crochet |
| sl st | Slip stitch |
| st / sts | Stitch / stitches |
| inc | Increase: work two sc into one stitch |
| rep | Repeat |
| RS / WS | Right side / wrong side |
In UK terminology, a US single crochet is called a double crochet, and a US double crochet is called a treble crochet. Keep that difference in mind when following crochet tutorials from different countries.
A few stitches worth practicing
If you’re new to crochet, spend a moment practicing the half double crochet, double crochet, and treble crochet before beginning the petals.
The half double crochet is shorter than a double crochet, and a treble crochet is taller. Combining these heights is what gives the sunflower petals their gently pointed shape.
You will also make a tiny picot, which is simply a short chain joined back to itself to form a decorative point.
Before You Start
Choose a comfortable yarn tension
For this sunflower, slightly firm, even tension works best.
If your stitches are too loose, the center can develop visible spaces and stuffing may show through. If you pull the yarn too tightly, the flower may curl or feel stiff.
Aim for stitches that sit snugly beside one another while allowing your hook to pass through comfortably.
Gauge and finished size
Exact gauge is not essential for this decorative project.
With DK cotton and a 3.5 mm hook, a reasonable planning estimate is a finished flower head approximately 9–12 cm (3½–4¾ inches) across, depending on your yarn, stitch height, and tension. This is an estimate, not a tested finished measurement.
If you intend to crochet several matching sunflowers, make your first flower a sample and measure it before continuing.
How to count your stitches
When looking at the top of your crochet circle, each regular stitch forms a small V.
Count these V shapes around the edge rather than counting the chain used to begin a round.
In this pattern, the chain 1 at the start of a center round does not count as a stitch, and the joining slip stitch does not count either.
Keep the flower center flat
A crochet circle needs regular increases to grow without becoming a cup.
If your center begins curling upward, check your stitch count and tension. If it becomes excessively wavy, check whether you’ve accidentally worked too many increases.
A slight unevenness is normal before shaping. The important thing is to avoid a strongly cupped or ruffled circle.
Understand the flower construction
You’ll make two small circular pieces:
- A cocoa-brown front center.
- A sage-green backing.
Both will finish with 32 stitches around the outside.
The yellow petals will be worked around the edges, helping hold the two circles together. The result can remain almost flat or become slightly padded with a tiny amount of stuffing.
Unlike a sunflower pattern that requires every petal to be made separately and sewn on afterward, this construction keeps the main assembly relatively simple.
Step-by-Step Crochet Sunflower Tutorial
Step 1: Make a Magic Ring
Start with your cocoa-brown yarn.
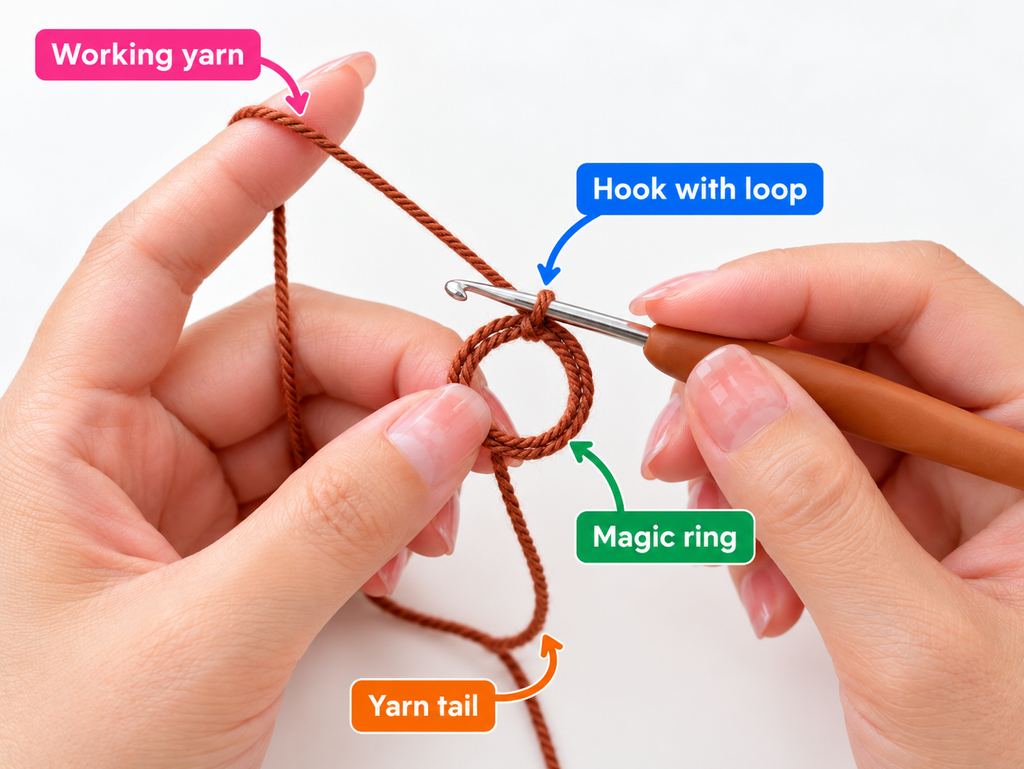
Wrap the yarn loosely around two fingers, crossing the working yarn over the short tail to create a loop.
Insert your crochet hook under the loop, catch the working yarn, and pull it through.
Chain 1 to secure the ring.
Keep the adjustable loop open because you’ll work your first single crochet stitches directly inside it.
Beginner tip: Leave a tail at least 10–15 cm long so you can close and secure the center more easily.
Common mistake to avoid: Don’t pull the magic ring completely closed before you’ve crocheted your first round. It will be much harder to insert the hook.
Step 2: Crochet the First Round
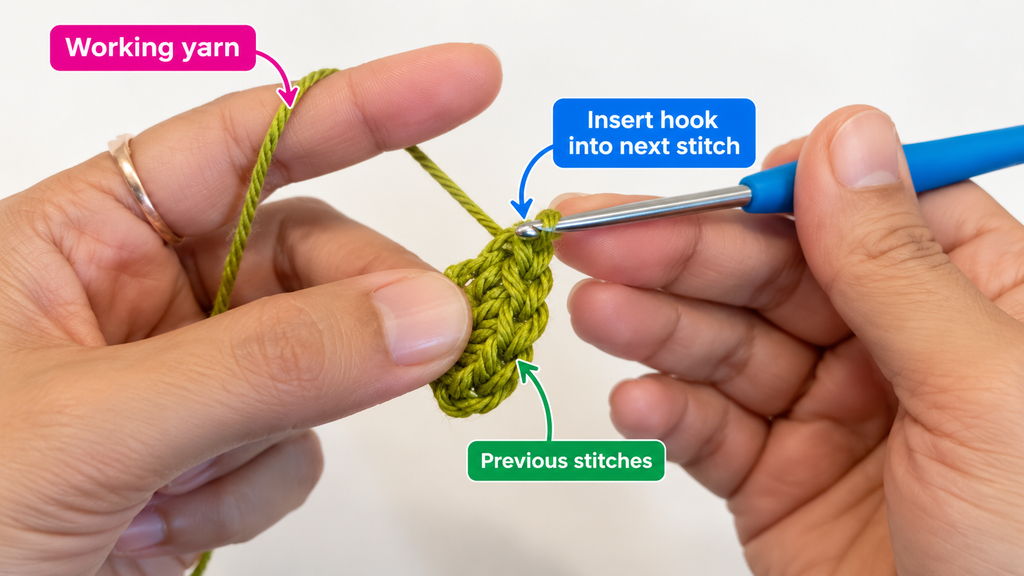
Work eight single crochet stitches into the magic ring.
To make each single crochet:
- Insert your hook through the center of the ring.
- Yarn over and pull up a loop.
- Yarn over again.
- Pull through both loops on the hook.
Repeat until you have eight single crochet stitches.
Gently pull the yarn tail to tighten the center opening.
Slip stitch into the top of the first single crochet to join the round.
You should now have 8 stitches.
This is the foundation of your sunflower’s center, so take a moment to make sure the stitches are sitting neatly together.
Beginner tip: Use a stitch marker to identify the first stitch. Small crochet circles can be difficult to count at first.
Common mistake to avoid: Make sure all eight stitches go into the magic ring, rather than accidentally inserting your hook into a previous stitch.
Step 3: Increase to Form a Wider Circle
Now it’s time to expand the center.
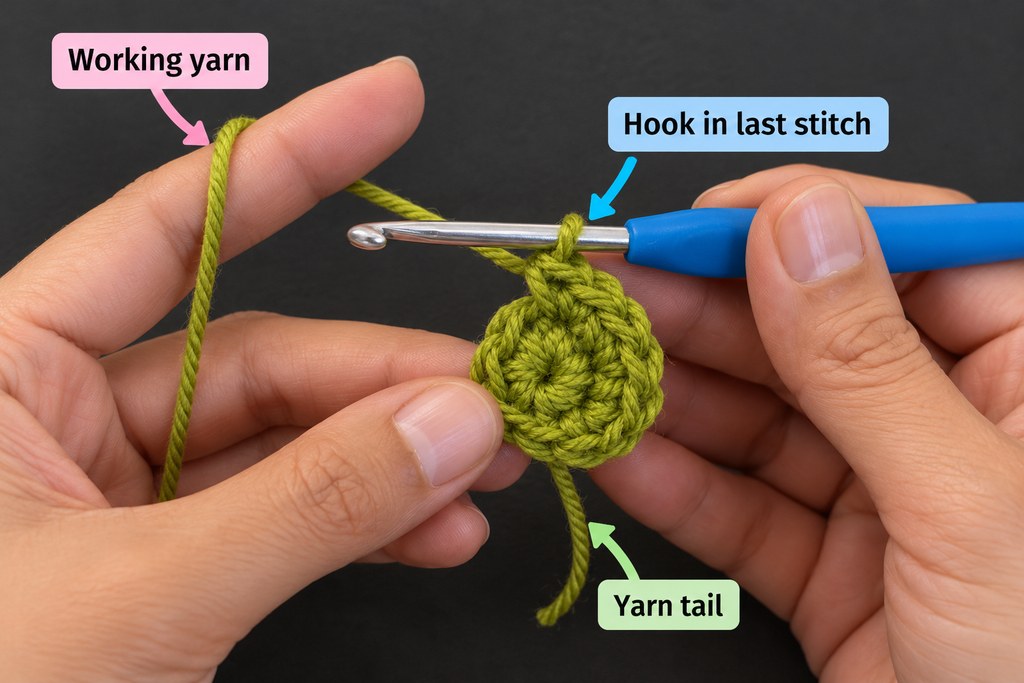
Round 2: Chain 1, then work two single crochet stitches into every stitch around.
When you work two stitches into one stitch, you create an increase.
Because you started with eight stitches, doubling every stitch gives you 16.
Once you’ve completed the round, slip stitch into the first single crochet.
Stitch count: 16 sc.
Your center should now resemble a small, flat circular disc.
It may look a little thick near the middle. That’s normal with cotton yarn, especially when using a magic ring.
Beginner tip: Count your stitches before joining the round. Correcting a missing increase now is much easier than discovering the mistake later.
Common mistake to avoid: Avoid crocheting into the joining slip stitch. Only the actual single crochet stitches from the previous round should receive increases.
Step 4: Crochet the Third Round
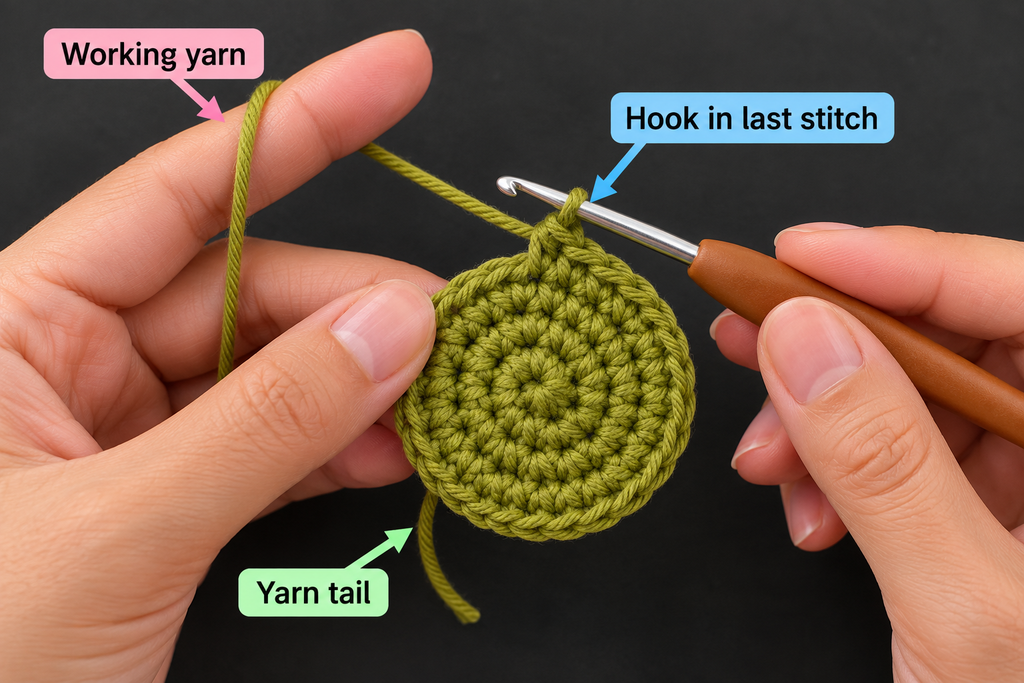
Round 3: Chain 1.
Work one single crochet into the next stitch, then two single crochet stitches into the following stitch.
Repeat this sequence eight times:
(1 sc, inc) × 8
Join with a slip stitch.
Stitch count: 24 sc.
This round spreads the increases more evenly. Instead of placing two stitches into every stitch, you’re adding one increase after each regular single crochet.
The circle should begin looking more defined, with small concentric rounds radiating outward from the center.
If you’re using dark yarn, work somewhere bright so you can see the individual stitch tops easily.
Beginner tip: Count in groups of three for this round. Eight groups of three stitches equal 24.
Common mistake to avoid: Do not accidentally work an increase into both stitches of a group. You need one regular single crochet followed by one increase.
Step 5: Finish the Brown Sunflower Center
Round 4: Chain 1.
Work one single crochet into each of the next two stitches, then make an increase in the following stitch.
Repeat eight times:
(2 sc, inc) × 8
Slip stitch to join.
Stitch count: 32 sc.
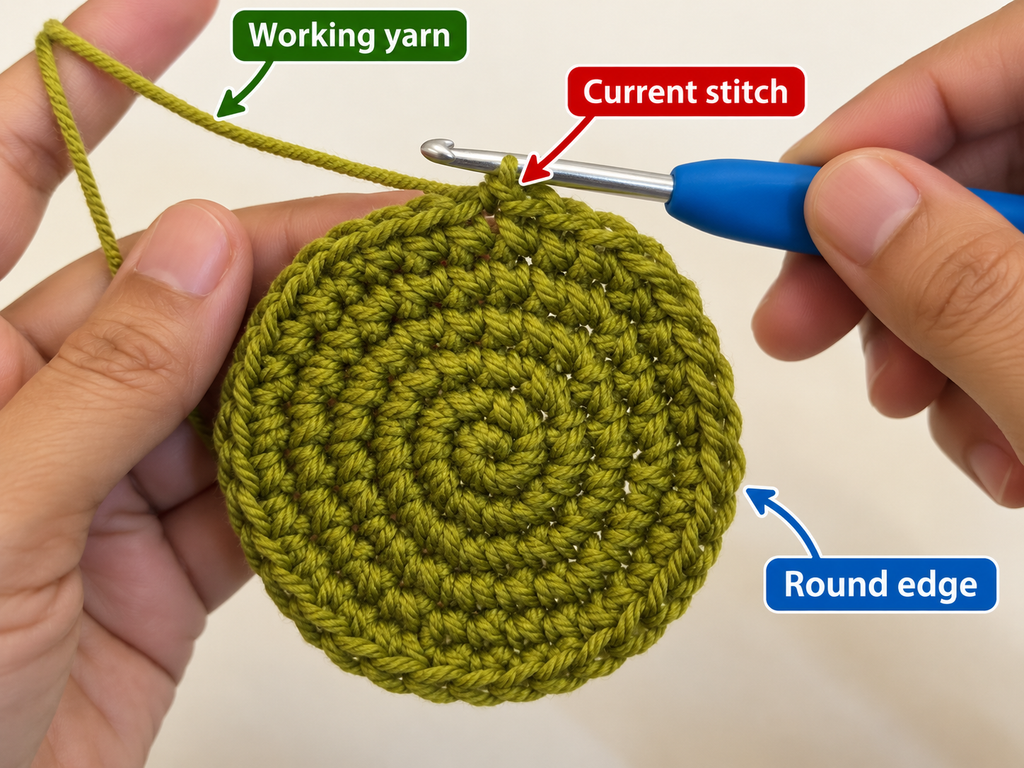
Your sunflower’s brown center is now complete.
Fasten off, leaving a tail long enough to weave in securely.
Place the circle on a flat surface and smooth it gently with your fingers.
The outer edge does not need to be perfectly rigid or absolutely circular. A handmade crochet piece often settles into its shape after you add the petals and finish it.
However, if the center curls dramatically, check that you’ve completed all eight increases.
Beginner tip: Count the final 32 stitches twice. Each petal will use two edge positions, so the correct count is important.
Common mistake to avoid: Don’t cut your yarn immediately after the last single crochet without first securing the final loop.
Step 6: Make the Matching Green Back
Next, take your muted sage-green yarn.
You’re going to make a second circle using exactly the same instructions as the brown center.
This creates a tidy reverse side and gives the flower a slightly more substantial shape.
Follow these rounds:
| Round | Instructions | Stitch count |
|---|---|---|
| 1 | 8 sc into magic ring | 8 |
| 2 | Inc in every stitch | 16 |
| 3 | (1 sc, inc) × 8 | 24 |
| 4 | (2 sc, inc) × 8 | 32 |
Fasten off and weave in the starting tail.
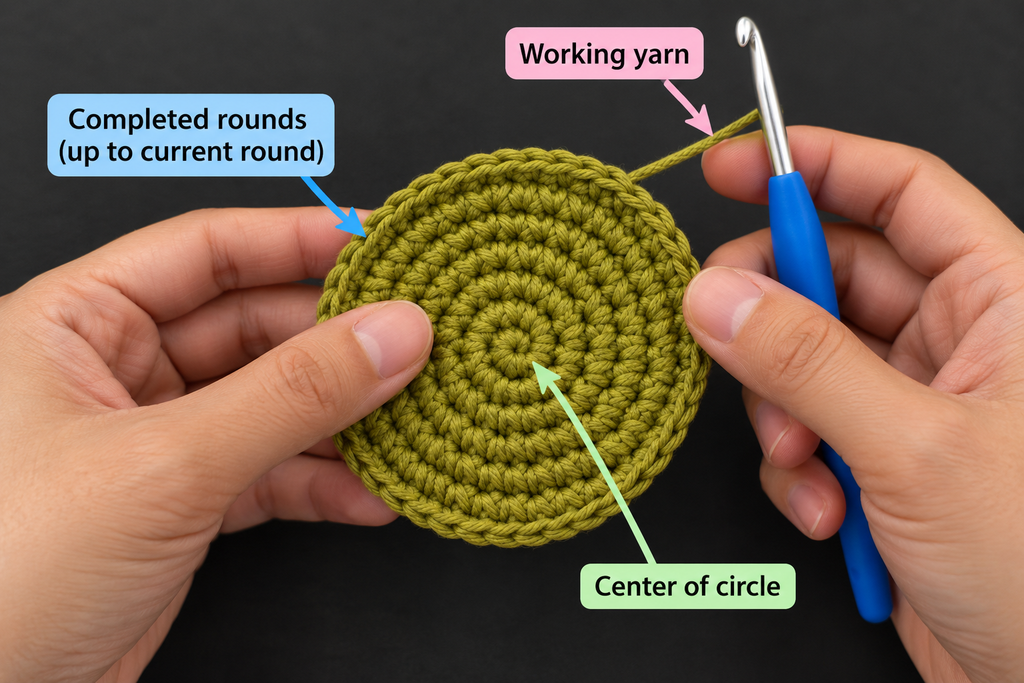
Lay the two circles on top of each other.
The green piece should match the brown circle fairly closely in diameter. If one piece is noticeably larger, compare your stitch counts and tension before proceeding.
Keep the wrong sides together, with the more attractive brown face facing outward and the green side visible on the back.
Beginner tip: If possible, crochet both discs during the same sitting. It helps maintain a similar tension.
Common mistake to avoid: Don’t use a different hook size for the green circle unless you’re deliberately correcting a gauge difference.
Step 7: Attach the Yellow Yarn Through Both Layers
Place the brown and green crochet circles together, with their edges neatly aligned.
Hold the brown face toward you.
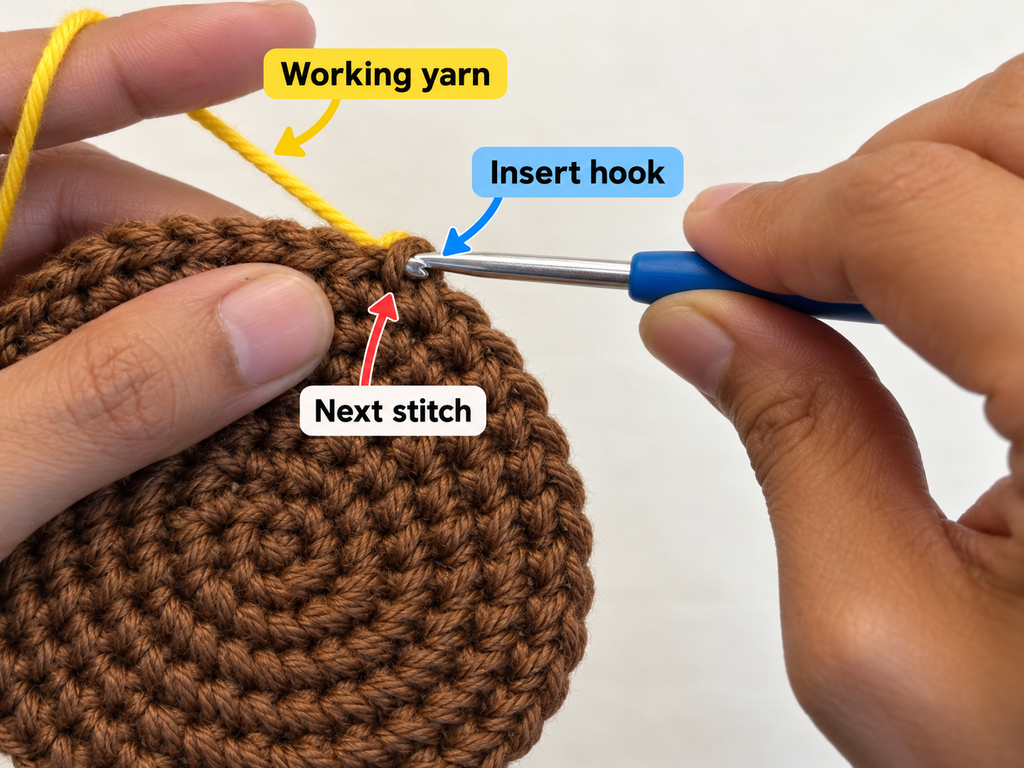
Make a slip knot with the golden-yellow yarn and place it on your hook.
Insert the hook through the top loops of the first matching stitch on both circles. Yarn over and pull through the stacked stitches and the loop on your hook to make a slip stitch.
Your yellow yarn is now secured.
You’ll crochet each petal into the joined edges of these two pieces. When the instructions say to insert the hook into a center stitch, insert it through both discs.
Think of the two circles as one fabric layer with 32 paired edge stitches.
For the petals, the chains and taller stitches are worked from these paired base positions.
Beginner tip: Use a stitch marker to identify the starting point. It will help you recognize where the last petal should meet the first.
Common mistake to avoid: Check that you’re working through both layers. Accidentally catching only the brown front can leave the green back loose.
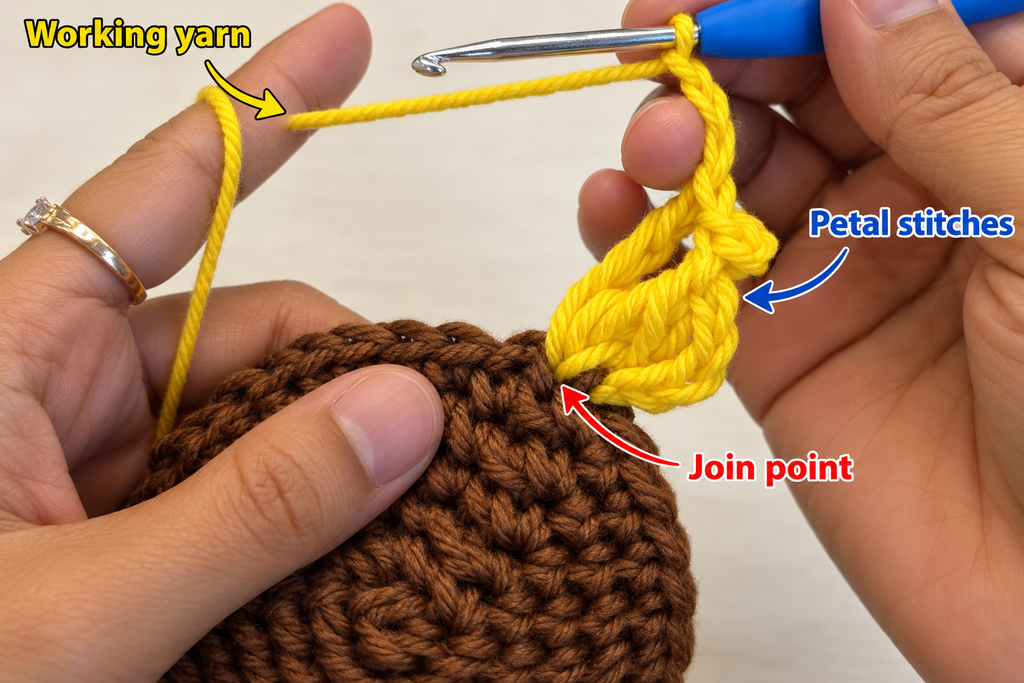
Step 8: Crochet the First Yellow Petal
Now comes the part where your crochet piece starts looking like a sunflower.
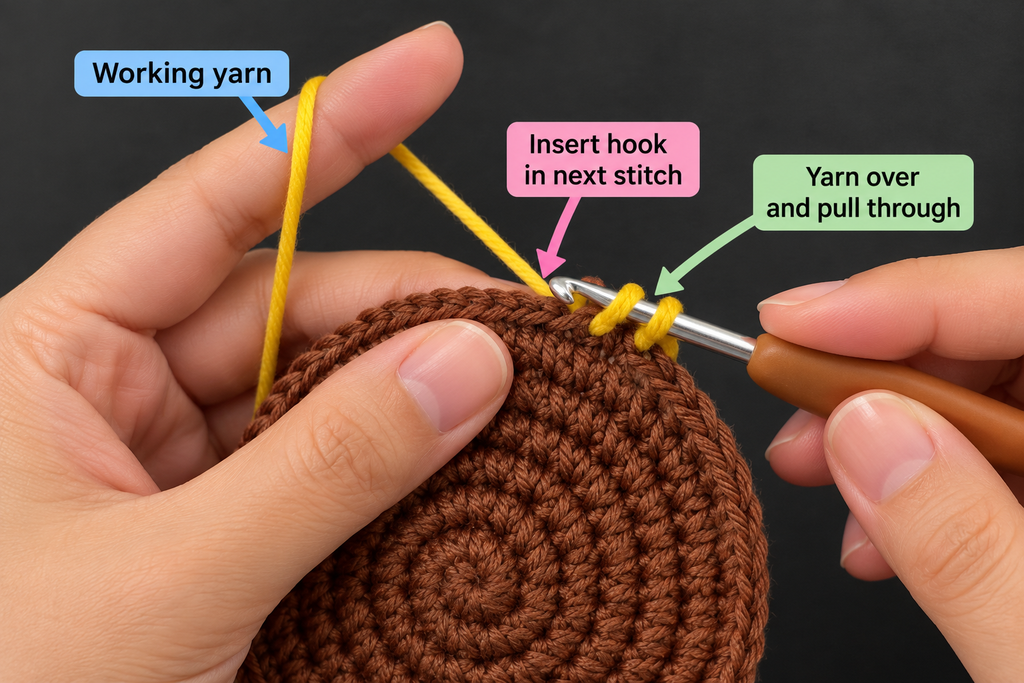
Each petal uses one base stitch for a group of different-height crochet stitches, followed by a slip stitch in the next base stitch.
You have already joined your yellow yarn with a slip stitch into the first paired base stitch. Keep working into that same base stitch for the first petal.
Work the following sequence:
- Chain 2.
- Work 1 hdc into the same base stitch.
- Work 1 dc into the same base stitch.
- Work 1 tr into the same base stitch.
- Chain 2, then slip stitch into the first of those two chains to create a small picot.
- Work another tr into the same base stitch.
- Work 1 dc into the same base stitch.
- Work 1 hdc into the same base stitch.
- Chain 2 and slip stitch into the same base stitch to finish the petal.
- Slip stitch through both discs in the next paired base stitch.
Your first petal is complete.
The shorter stitches create the sides, while the treble stitches provide height. The tiny picot gives the top a pointed finish.
Each petal contains six tall or medium-height stitches, with the opening and closing chains shaping its edges.
Beginner tip: If you’re unsure about treble crochet, remember that you yarn over twice before inserting the hook, then pull through two loops at a time until only one loop remains.
Common mistake to avoid: Keep all the petal-building stitches in the same base stitch. Moving part of the group into the next stitch will change the petal shape.
Step 9: Check the Petal Shape and Picot Tip
Before continuing around the flower, pause and look at your first petal.
It should have a rounded lower section, gradually rising sides, and a small point near the top.
The stitches should have enough room to spread without becoming very loose.
Gently smooth the petal outward with your fingers.
If the decorative picot seems to disappear, you may have pulled the chain too tightly. Try loosening it slightly.
If the petal twists, check whether you’ve inserted the hook through the correct paired base stitch and worked all six shaping stitches in that spot.
Don’t worry if the first petal doesn’t lie perfectly flat yet. The remaining petals help the edge settle into a more balanced flower shape.
Beginner tip: Make a sample petal with scrap yarn if you’re practicing this stitch combination for the first time.
Common mistake to avoid: The picot slip stitch goes into the first chain of the short chain-2 picot, not into the brown center.
Step 10: Repeat the Petals Around the Center
You’re ready to continue.
Your first petal used two paired base stitches: the first held the petal group, and the second received the anchoring slip stitch.
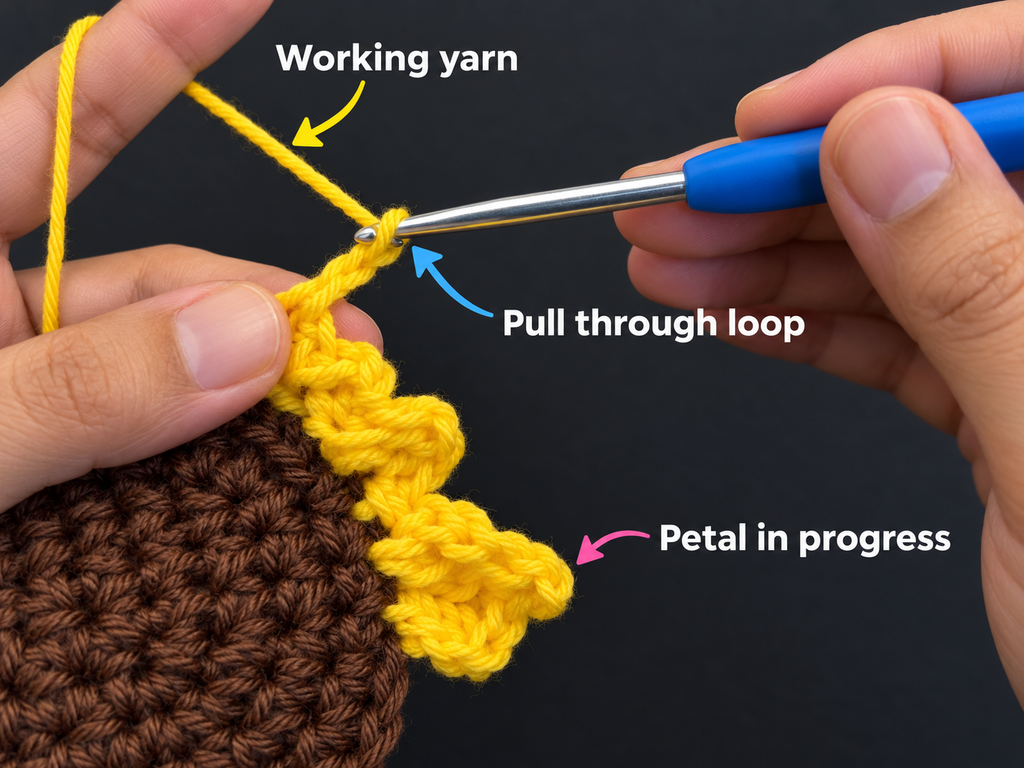
Move to the next unused paired base stitch and make another slip stitch. Work the same petal group into that stitch, then anchor it with a slip stitch in the following paired stitch.
Continue in this manner around the edge.
Petal repeat:
Sl st in next st, ch 2, hdc, dc, tr, ch-2 picot, tr, dc, hdc, ch 2, sl st in same st; sl st in next st.
For the hdc, dc, and tr stitches in this repeat, always work into the same paired base stitch as the first slip stitch of that petal.
Each complete repeat uses two paired base stitches.
Because your flower center has 32 stitches around the edge, you’ll make:
32 ÷ 2 = 16 petals.
Work until you have 14 petals completed, then stop temporarily if you’re adding stuffing.
If you’re making a completely flat sunflower, you can skip the stuffing and continue through all 16 petals.
Try to maintain the same tension from petal to petal so their heights look consistent.
Beginner tip: Count finished petals rather than only counting stitches at this stage. A quick visual count every four petals makes it easier to stay on track.
Common mistake to avoid: Don’t skip the separating slip stitch between petal groups, or your petals may bunch together.
Step 11: Add a Little Stuffing and Complete the Flower
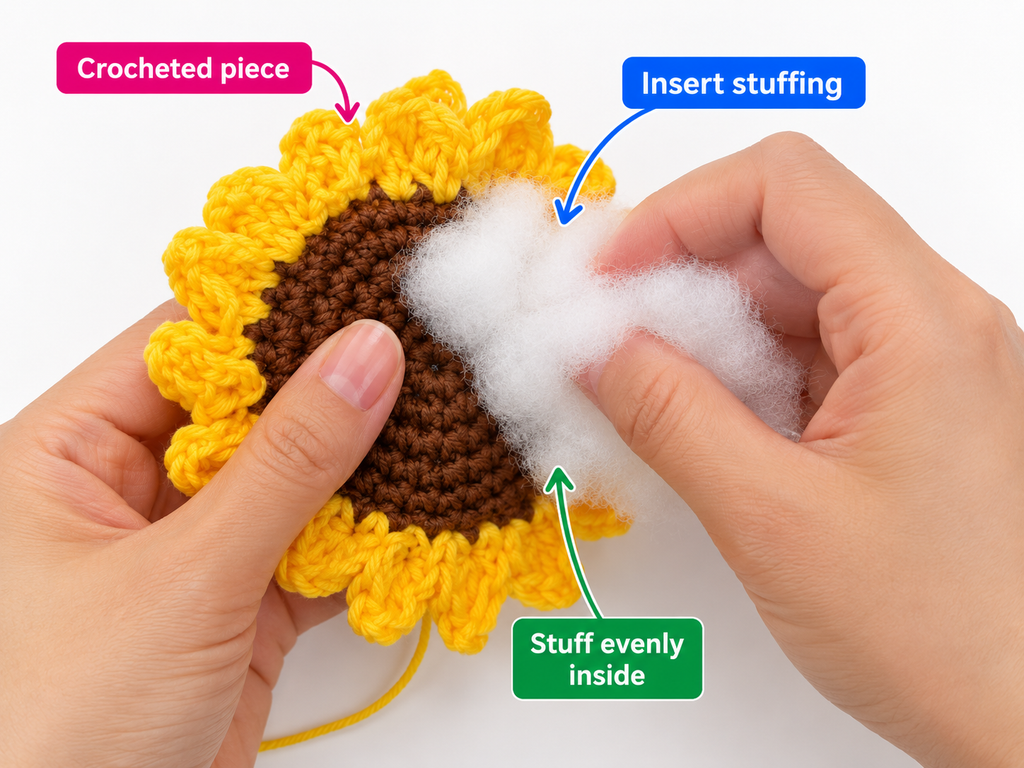
If you’d like a slightly raised sunflower center, add a very small amount of polyester fiberfill between the two circles.
Gently push the stuffing into the opening left near the unfinished edge.
You want the brown front to look softly rounded, rather than forming a large dome.
Too much stuffing can stretch the center and make the stitch gaps more visible.
Once you’re happy with the shape, finish the final two petals using the same repeat as before.
After the last anchoring slip stitch, join neatly to the beginning of the petal round if needed, then fasten off the yellow yarn.
Weave the tail securely into the reverse side.
Count your petals.
You should have 16 golden-yellow petals arranged around the center.
Gently move around the flower, using your fingertips to spread and shape the petals.
Beginner tip: Insert the stuffing a little at a time. You can add more if needed, but removing excess afterward is inconvenient.
Common mistake to avoid: Don’t finish the entire border before remembering the stuffing. Once closed, the edge is difficult to reopen cleanly.
Step 12: Crochet a Small Green Leaf (Optional)
A little green leaf gives your sunflower an extra handmade touch, especially if you’re attaching it to a stem.
Using sage-green yarn, make a foundation chain of 10.
Starting in the second chain from your hook, work:
- 1 sc in the first chain.
- 1 hdc in the next chain.
- 1 dc in each of the next two chains.
- 1 tr in the next chain.
- 1 dc in each of the next two chains.
- 1 hdc in the next chain.
- 1 sc in the last chain.
You’ve now worked nine stitches along one side of the foundation chain.
Chain 1 and turn the piece slightly so you can crochet into the unused loops along the opposite side of the chain.
Work back along the other side:
- 1 sc in the first available chain loop.
- 1 hdc in the next.
- 1 dc in each of the next two.
- 1 tr in the next.
- 1 dc in each of the next two.
- 1 hdc in the next.
- 1 sc in the final chain loop.
Slip stitch near the starting point to close.
Fasten off, leaving a long tail for attaching the leaf.
This simple leaf has a softly pointed, elongated shape with taller stitches near the middle.
If you’d like a longer leaf, use a longer foundation chain and extend the middle section of taller stitches on both sides.
Beginner tip: Turn the chain carefully before working the second side. Keeping the same foundation chain in the center creates the leaf’s central ridge.
Common mistake to avoid: Avoid working both sets of stitches into the same chain loops from the same direction. The second set needs to follow the other side of the foundation.
Pattern Notes and Stitch Counts
The main sunflower pattern is worked in joined rounds.
The front and back discs are identical in stitch count. The only difference is yarn color.
| Section | Result |
|---|---|
| Brown center, round 1 | 8 sc |
| Brown center, round 2 | 16 sc |
| Brown center, round 3 | 24 sc |
| Brown center, round 4 | 32 sc |
| Green backing | Repeat all four rounds |
| Petal round | 16 petals |
| Base stitch positions per petal | 2 |
| Main shaping stitches per petal | 2 hdc, 2 dc, 2 tr |
| Petal tip | Chain-2 picot |
Turning chain rule: Each center round begins with chain 1, which does not count as a stitch.
Joining rule: Join each center round with a slip stitch into the first actual single crochet.
Right side/wrong side: Position the preferred side of the brown disc outward and the green backing behind it.
Repeat rule: Each petal uses one paired base stitch for the petal shaping and one paired base stitch for the anchoring slip stitch.
Size adjustment: Changing yarn weight and hook size is the simplest way to change the finished flower size while keeping all counts the same. Enlarging the brown center with additional rounds would require redesigning the petal allocation.
Pattern note: This is a newly constructed design and has not been physically sample-tested in this conversation. Work one sample and verify the fit, petal shape, and measured size before publishing it as a tested pattern.
Common Beginner Mistakes and How to Fix Them
Even small crochet projects have moments where something doesn’t look quite right. Here are the most common issues to watch for.
1. The sunflower center is curling
If your center is turning upward like a little bowl, your tension may be too tight, or you might have missed an increase.
Check your stitch count and compare it with the round instructions. Gently flatten the disc and try using slightly looser tension.
2. The flower center is wavy
A badly ruffled edge may indicate too many increases or unusually loose stitches.
Count your completed round carefully. If your stitch count is correct but the fabric still waves strongly, try a slightly smaller hook or firmer tension.
3. The petals are different sizes
Uneven petals are often caused by changes in yarn tension, missing taller stitches, or inconsistent chain lengths.
Compare one finished petal with the next. Every petal should use the same shaping stitches in the same order.
4. There are gaps between the brown and green discs
This happens when the hook catches only the front layer or the two circles are not properly aligned.
Before beginning each petal, look at the edge and make sure the hook passes through both layers.
5. The flower has fewer than 16 petals
The design needs 32 paired base stitches.
If you run out of edge stitches before making 16 petals, you may have skipped a base stitch or accidentally used more than two positions for a petal.
Check the number of petals and the position of their anchoring slip stitches.
6. The sunflower looks too puffy
Too much stuffing can distort an otherwise neat crochet flower.
Before closing the final petals, remove some filling and gently flatten the center with your fingers.
7. The picot tip looks twisted
Picots need a little space to sit neatly.
If yours looks twisted, check that you joined the chain into its first chain and that you didn’t pull the yarn too tightly.
8. The yarn tails are visible
Short yarn tails can work their way to the front of the project.
Use a tapestry needle to weave each tail back and forth through several stitches on the wrong side. Trim only after it is secure.
How to Customize Your Crochet Sunflower
One of the nicest things about this pattern is how easily you can adapt it.
Change the sunflower colors
The classic golden-yellow and dark-brown combination is always beautiful, but it isn’t your only option.
For a soft, vintage look, choose mustard-yellow petals and a chocolate center. For a delicate spring version, try pale butter yellow with a warm tan center.
You can even create a whimsical sunflower using dusty pink or terracotta petals.
The construction remains exactly the same.
Try a different yarn
Cotton is especially useful for structured motifs, but acrylic is a practical alternative for blankets and soft accessories.
For a miniature flower, try lightweight cotton and a smaller hook.
For an oversized sunflower, experiment with a thicker yarn and a larger hook.
Remember that changing yarn weight changes the finished flower’s size, drape, and texture.
Make a flatter flower
For an appliqué, skip the fiberfill entirely.
The two layers will sit closer together, making the flower easier to attach to a hat, cardigan, blanket, or tote bag.
If you want a particularly thin appliqué, you can also make only the brown disc and work the petals through that single layer. This changes the reverse-side finish but keeps the same 32-stitch allocation.
Add extra texture
You can create a more textured seed-like center with small embroidered knots or short surface stitches worked into the finished brown circle.
Use a slightly lighter brown for the surface details to create subtle contrast.
Keep the decoration simple if the flower is intended for a beginner project or an accessory that will be washed frequently.
Use your sunflower for gifts
Finishing Instructions
After completing the sunflower head and optional leaf, there are a few simple finishing details that help your project look neat.
Fasten off securely
To fasten off, cut the working yarn and pull the tail completely through the final loop.
Tighten gently to secure it without pulling the surrounding crochet stitches out of shape.
Don’t cut the tail flush with the fabric.
Weave in the yarn ends
Thread the loose yarn tail onto a tapestry needle.
Pass it through several stitches on the reverse side of the flower. Change direction at least once to help prevent the tail from coming loose.
Repeat for any other visible ends.
Add an optional stem
For a decorative sunflower on a stem, choose a smooth wooden dowel.
Wrap sage-green cotton yarn tightly around the dowel, working from one end toward the other.
Secure the ends with a small amount of suitable craft adhesive, following its safety and usage instructions.
Attach the leaf to the wrapped stem by stitching the leaf’s long tail through the wrapped yarn.
Once the flower head is complete, attach the stem securely to the backing with stitches around its top end. A small internal fabric or felt reinforcement can help distribute the pressure.
For a decorative item that will be handled often, make sure the connection is stable and cannot easily detach.
Keep pointed dowels, exposed wire, hot glue, and small detachable components away from young children. This construction is intended as decoration, not a baby toy.
Shape the petals
Lay the flower flat on a clean towel.
Use your fingers to spread the petals evenly around the center.
If necessary, lightly dampen the petals and pin them into position on a suitable blocking mat.
Let the flower dry completely before removing the pins.
Don’t press the petals directly with a hot iron. The correct blocking method depends on the yarn’s fiber content and care instructions.
Washing and care
If your sunflower is made from washable cotton yarn and has no rigid stem or delicate additions, you can usually hand-wash it gently.
Use cool or lukewarm water with a mild detergent suitable for the yarn.
Press out excess water without wringing, reshape the petals, and allow the flower to dry flat.
For stemmed decorative flowers, spot-cleaning is often safer because the dowel, adhesive, or added structural materials may not be washable.
The finished crochet sunflower
Once the petals are arranged and the ends are hidden, your sunflower is ready to use.
Its brown circular center adds warmth, the golden-yellow petals create a cheerful outline, and the sage-green leaf gives it a pretty botanical detail.
Make a single flower for a small handmade gift, or crochet several in slightly different shades of yellow for a sunflower bouquet.
Quick Printable-Style Crochet Sunflower Summary
Easy Crochet Sunflower — Pattern Card
Confident beginner · US terms · Approx. 60–90 minutes Copy pattern
Materials: DK cotton yarn in brown, yellow, and green; 3.5 mm hook; scissors; yarn needle; stitch marker; optional stuffing and stem.
Starting method: Magic ring.
Brown center:
- Round 1: 8 sc (8)
- Round 2: Inc around (16)
- Round 3: (1 sc, inc) × 8 (24)
- Round 4: (2 sc, inc) × 8 (32)
Green back: Repeat four rounds (32).
Petals: Work through both discs; 16 repeats using two paired base stitches per petal.
Petal repeat: Sl st in first paired stitch, ch 2, hdc, dc, tr, chain-2 picot, tr, dc, hdc, ch 2, sl st in same base stitch; sl st in next paired stitch.
Finishing: Stuff lightly if desired, weave in ends, arrange petals, and add optional green leaf and stem.
Frequently Asked Questions About Crochet Sunflowers
1. Is this crochet sunflower pattern suitable for beginners?
Yes, this pattern is suitable for confident beginners who know how to make single crochet stitches and are ready to practice double and treble crochet.
The center uses simple circular increases, while the petals follow one repeated stitch sequence.
If this is your first crochet project, practice making a basic flat circle before starting the sunflower.
2. What yarn is best for crocheting a sunflower?
DK cotton yarn is a great option because its stitch definition helps you see the center and petal shapes.
Cotton-blend yarn can also work well, particularly for decorative flowers or appliqués.
For a softer, more flexible sunflower, try acrylic yarn.
3. What crochet hook should I use for a sunflower?
A 3.5 mm hook is a practical starting point for DK cotton yarn in this pattern.
If your stitches feel too tight, try a slightly larger hook. If the center looks loose or has noticeable gaps, a smaller hook may give you better results.
4. How many petals should a crochet sunflower have?
There is no fixed number for every crochet sunflower pattern.
This particular design has 16 petals because its completed center has 32 edge stitches and each petal uses two stitch positions.
Other patterns may have fewer or more petals depending on their center size and construction.
5. How do I keep crochet sunflower petals from curling?
First, check that your stitches are worked at consistent tension.
You should also check the height and number of stitches used in each petal.
If the petals are slightly curled when finished, gently shape them with your hands. Light blocking can help when appropriate for your yarn.
6. Can I turn this crochet sunflower into an appliqué?
Absolutely.
Simply skip the stuffing and optional stem.
Once the flower is finished, use a yarn needle to sew it securely onto a bag, blanket, hat, cushion, or headband.
For a thinner appliqué, you can also omit the green backing and work the yellow petals directly around the brown center.
7. How can I make a crochet sunflower bouquet?
Make several sunflower heads using the same pattern.
Attach each flower to a suitable wrapped stem, then crochet one or two leaves for each.
Arrange the flowers in a vase or bundle them with ribbon for a handmade decorative gift. Keep any rigid or pointed construction materials securely covered and away from children.
Conclusion
A crochet sunflower is a lovely little project when you want to make something colorful without starting a large blanket or garment.
From the first magic ring to the final golden petal, this pattern gives you a chance to practice circular crochet, increases, taller stitches, simple shaping, and finishing techniques.
Once you’ve made your first flower, try experimenting with different shades of yellow, making a flat appliqué, or adding a green stem for a handmade bouquet.
Save this crochet sunflower pattern for your next relaxing crochet session, and consider pairing your flower with a simple crochet leaf, granny square, or floral blanket motif.