A handmade crochet cowl is one of those little accessories that can make a simple winter outfit feel instantly cozier. It keeps your neck warm, stays comfortably in place, and doesn’t have long scarf ends to wrap or tuck into your coat.
The best part? You don’t need to know complicated crochet stitches to make one.
This easy crochet cowl pattern uses two beginner stitches — single crochet and double crochet — to create a beautifully textured fabric that looks more interesting than plain rows. Once you learn the repeating pattern, you can settle into a relaxing rhythm while watching your cowl grow.
Unlike a traditional scarf, which is worked into one long strip, this neck warmer is crocheted into a continuous tube. That means there is no long seam to sew at the end.
If you can make a chain and have practiced a few basic stitches, this project is a wonderful next step.
In this tutorial, you’ll learn exactly how to crochet a cowl from the first slip knot to the final woven-in yarn tail. We’ll cover yarn choices, hook size, stitch placement, measuring, troubleshooting, and simple ways to adjust the fit.
And if this is your first wearable crochet project, don’t worry. Every stage is broken down into manageable steps.
What You’ll Learn
By the end of this tutorial, you’ll know how to:
- Choose yarn and a hook for a soft, comfortable crochet cowl.
- Make a long foundation chain without twisting it.
- Join crochet stitches to work in rounds.
- Alternate single and double crochet to create a textured neck warmer.
- Use a stitch marker to identify the beginning of each round.
- Adjust the circumference and height to suit your preferences.
- Fasten off, weave in ends, and shape your finished project.
The finished cowl is ideal for cool autumn afternoons, chilly winter mornings, and handmade gifts.
Crochet Cowl Pattern at a Glance
| Pattern Detail | Information |
|---|---|
| Skill level | Beginner |
| Construction | Joined, turned rounds |
| Yarn weight | #4 worsted |
| Hook | 5.5 mm (I/9) |
| Yarn amount | Approximately 200–250 yards (183–229 m) |
| Starting chain | 88 chains |
| Stitches per round | 88 |
| Finished circumference | Target about 27–29 inches (69–74 cm) |
| Finished height | Target about 8–9 inches (20–23 cm) |
| Estimated time | 3–5 hours |
| Sizing | Adjustable adult one-loop cowl |
The finished dimensions and yarn usage are design targets, not measurements from a tested sample. Always check your own gauge and measure the cowl as you work.
Materials You’ll Need
The right yarn can make all the difference when crocheting something that sits close to your skin.
For this pattern, I recommend using soft worsted-weight yarn in a solid or gently heathered shade. A smooth yarn makes your stitches easier to recognize, which is particularly helpful for beginners.
Yarn
You’ll need approximately 200–250 yards of #4 medium-weight yarn.
A soft acrylic yarn is an excellent first choice because it is affordable, widely available, and often machine washable.
A wool-blend yarn can provide additional warmth and give your cowl a slightly more natural, cozy appearance.
If you’re sensitive to wool, look for an acrylic, cotton-blend, or another soft yarn that feels comfortable against your neck.
Avoid extremely fuzzy or textured novelty yarn for your first attempt. It can make individual stitches difficult to identify.
Crochet hook
Use a 5.5 mm crochet hook to begin.
If your stitches are very tight, consider a 6 mm hook. If your fabric has larger holes than you prefer, experiment with a 5 mm hook instead.
Your goal is a fabric that feels soft and flexible without becoming excessively loose.
Additional tools
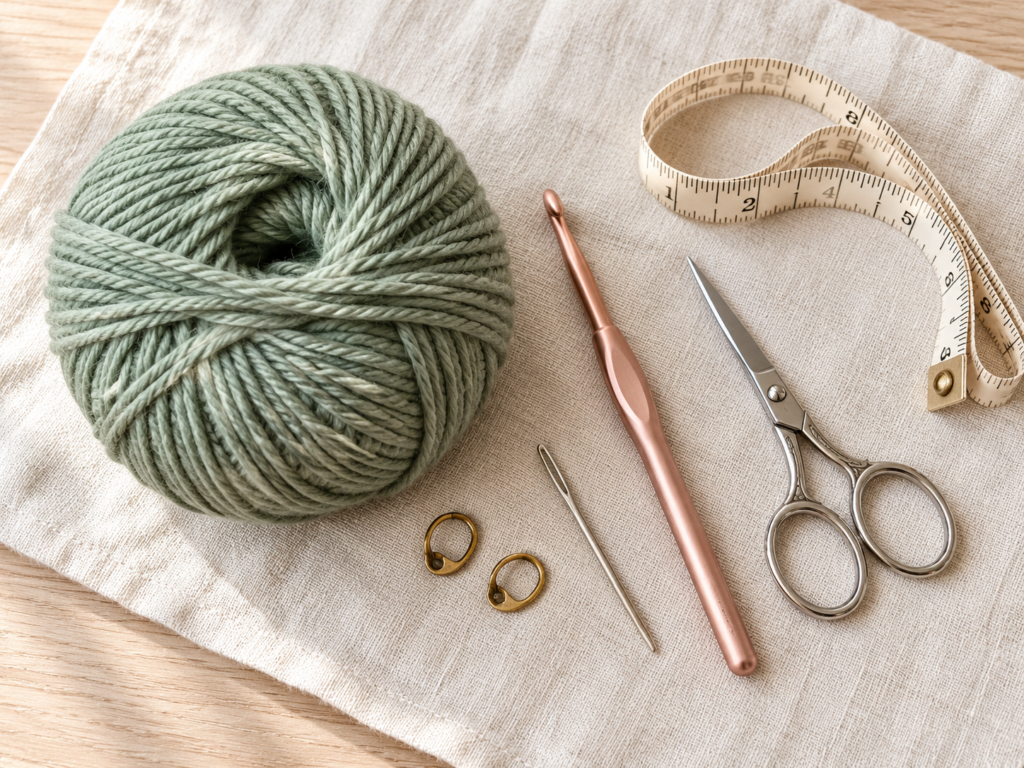
You’ll also need scissors, a blunt tapestry needle, a flexible measuring tape, and one or two stitch markers.
A notebook or a simple row counter is useful but optional.
Crochet Abbreviations Used
This pattern uses US crochet terminology throughout.
| Abbreviation | Meaning |
|---|---|
| ch | Chain |
| sc | Single crochet |
| dc | Double crochet |
| sl st | Slip stitch |
| st / sts | Stitch / stitches |
| rep | Repeat |
| RS | Right side |
| WS | Wrong side |
If you are familiar with UK crochet terminology, remember that US single crochet is called UK double crochet, and US double crochet is called UK treble crochet.
How to make a single crochet
Insert your hook into the next stitch, yarn over, and pull up a loop.
You should have two loops on your hook.
Yarn over again and pull through both loops.
That’s one single crochet.
How to make a double crochet
Yarn over before inserting your hook into the next stitch.
Pull up a loop so that you have three loops on the hook.
Yarn over and pull through two loops.
Yarn over once more and pull through the remaining two loops.
That’s one double crochet.
The difference in height between these two stitches creates the simple horizontal texture used throughout this cowl.
Before You Start
Understanding gauge
Gauge describes how many stitches and rows or rounds fit into a particular measurement.
For a wearable cowl, your gauge affects the finished circumference, height, and drape.
Because crochet tension varies, one person’s 88-stitch chain may be several inches longer than someone else’s.
For the intended 27–29-inch circumference, aim for approximately 12–13 stitches over 4 inches (10 cm) across the pattern fabric.
This is a planning target. Make a small swatch using the same alternating stitch texture, wash it if appropriate for your yarn, and measure it without stretching.
A simple fit-check method: Make your starting chain, lay it flat, and measure its length before joining. Aim for an easy-to-wear circumference that will pass comfortably over the intended wearer’s head.
A chain that feels too short should be adjusted before you work several rounds.
How to count crochet stitches
Look at the top of your crochet fabric.
Most stitches form a small V shape.
Each V is one stitch.
When you count the stitches in your round, do not count your beginning chain or the slip stitch used to join the round.
This tutorial uses 88 actual single or double crochet stitches in each completed round.
How to prevent curling
Mild curling can happen during the first few rounds. Often, the fabric settles as it grows.
If the starting chain pulls tight while the stitches above it spread outward, try making the chain with a larger hook.
If the cowl becomes wider with every round, check that you aren’t accidentally working into the joining slip stitch.
If the fabric feels rigid, loosen your tension slightly or move up a hook size.
Choosing a color
For a first crochet cowl, choose a light or medium shade that makes stitches easy to see.
Dusty sage, oatmeal, soft mauve, pale blue, and warm gray are lovely options.
Very dark yarn can be more challenging because the loops are harder to distinguish in low light.
Pattern construction
You’ll create an untwisted chain ring, work a base round of single crochet, then alternate double crochet and single crochet rounds.
Each completed round is joined with a slip stitch, and you’ll turn your work before beginning the next one.
Turning helps the texture appear balanced on both faces of the fabric.
You won’t need to increase or decrease stitches.
Step-by-Step Crochet Tutorial
Step 1: Make Your Foundation Chain
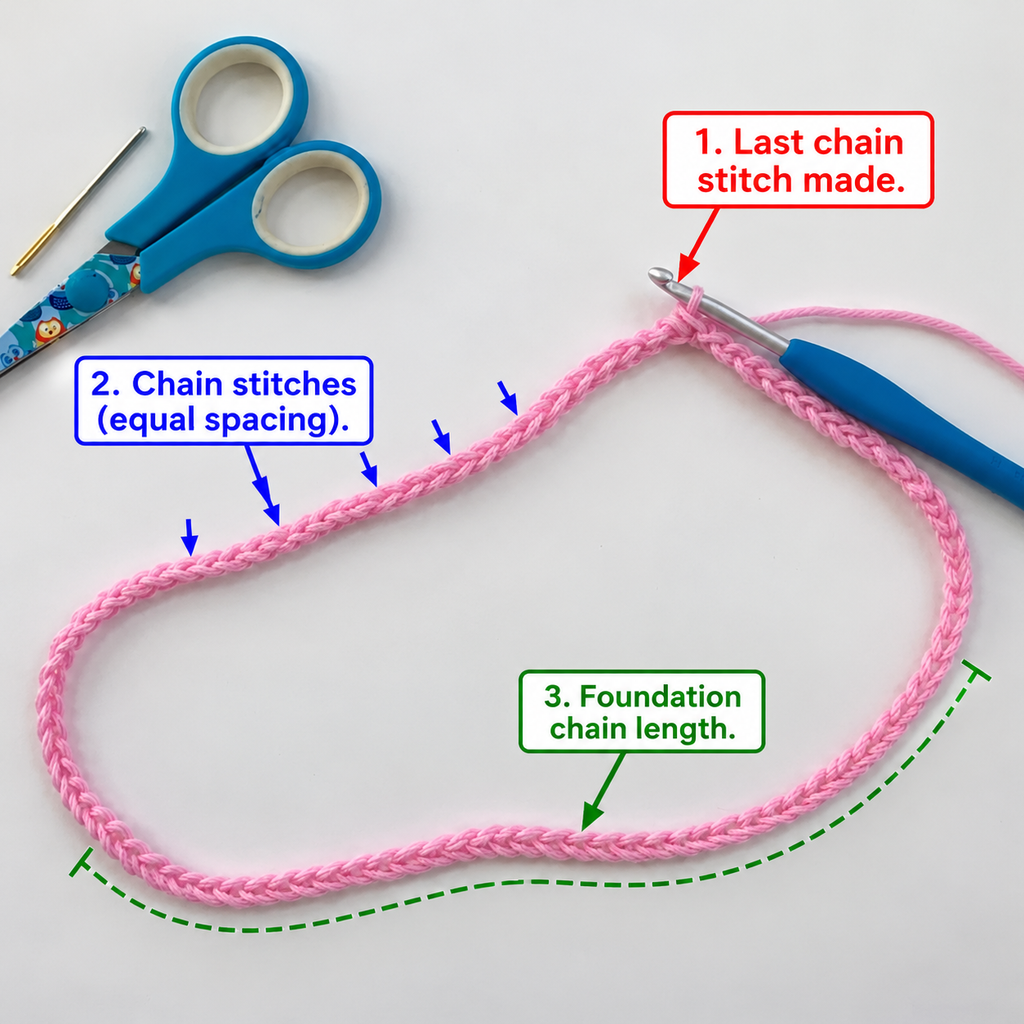
Start by making a slip knot and placing it onto your 5.5 mm crochet hook.
Hold your working yarn comfortably in your non-dominant hand.
Yarn over and pull the working yarn through the loop on your hook. You’ve made your first chain stitch.
Continue until you have 88 chain stitches.
Try to keep your chains loose and approximately the same size.
An even foundation chain will create a neater bottom edge and make the first round much easier to work.
If you tend to crochet tightly, you can make this starting chain using a 6 mm hook and switch back to 5.5 mm for the rest of your cowl.
Before joining, lay the chain on a flat surface and measure it.
If it is significantly shorter or longer than the intended cowl circumference, adjust the chain count now. Your final stitch count will equal your chosen starting number.
Beginner tip: Count the small V shapes rather than the loop currently on your hook. Placing a stitch marker every 20 chains can help you keep track.
Common mistake to avoid: Pulling each new chain too tightly. Your hook should glide easily into the chains later.
Step 2: Join the Chain into a Ring
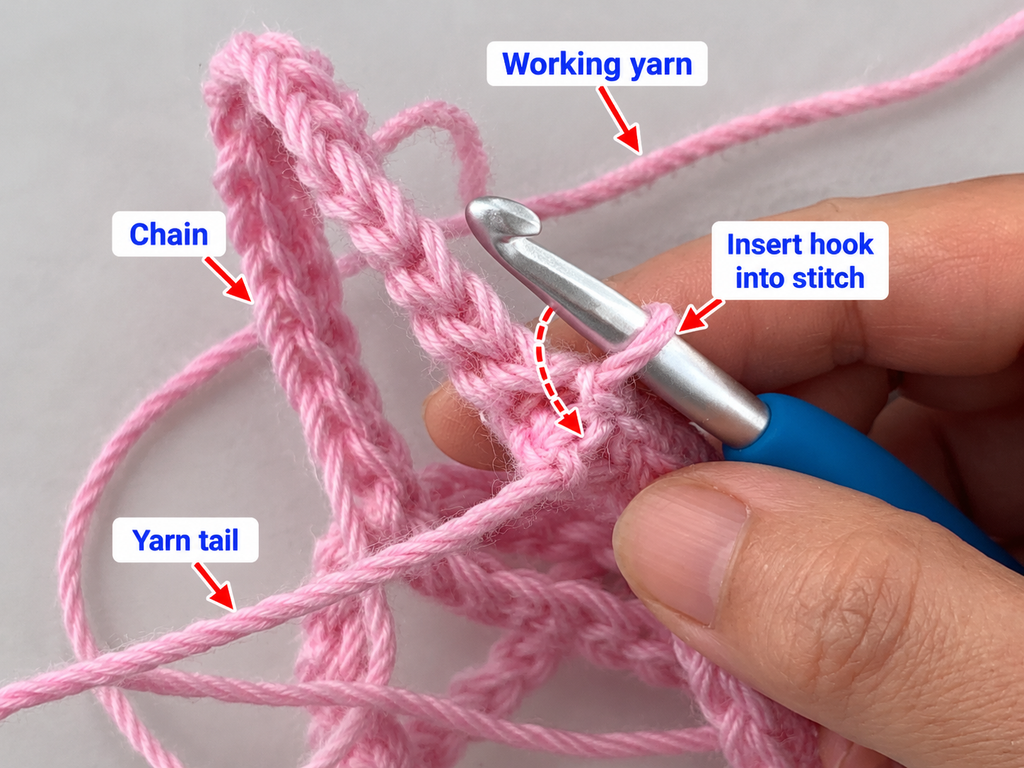
Once your foundation chain is complete, carefully place it on the table in front of you.
Make sure all the chain stitches face the same direction.
Slowly follow the chain from your hook toward the first stitch, checking that the chain hasn’t rolled or twisted along the way.
Bring the first chain stitch close to the loop on your hook.
Insert your hook into that first chain stitch.
Yarn over and pull through the chain and the loop already on your hook in one motion.
You’ve created a slip stitch join.
Your starting chain should now form one continuous ring.
Before moving on, hold the ring open and check it again.
If the chain is twisted, undo the slip stitch and straighten the foundation before joining again.
Beginner tip: Keep your chain flat on the table until the join is complete. This makes twisting much easier to spot.
Common mistake to avoid: Joining into the second or third chain instead of the first one. That changes your stitch count and can leave a small gap.
Step 3: Crochet the First Round
Now you’ll begin building the body of your cowl.
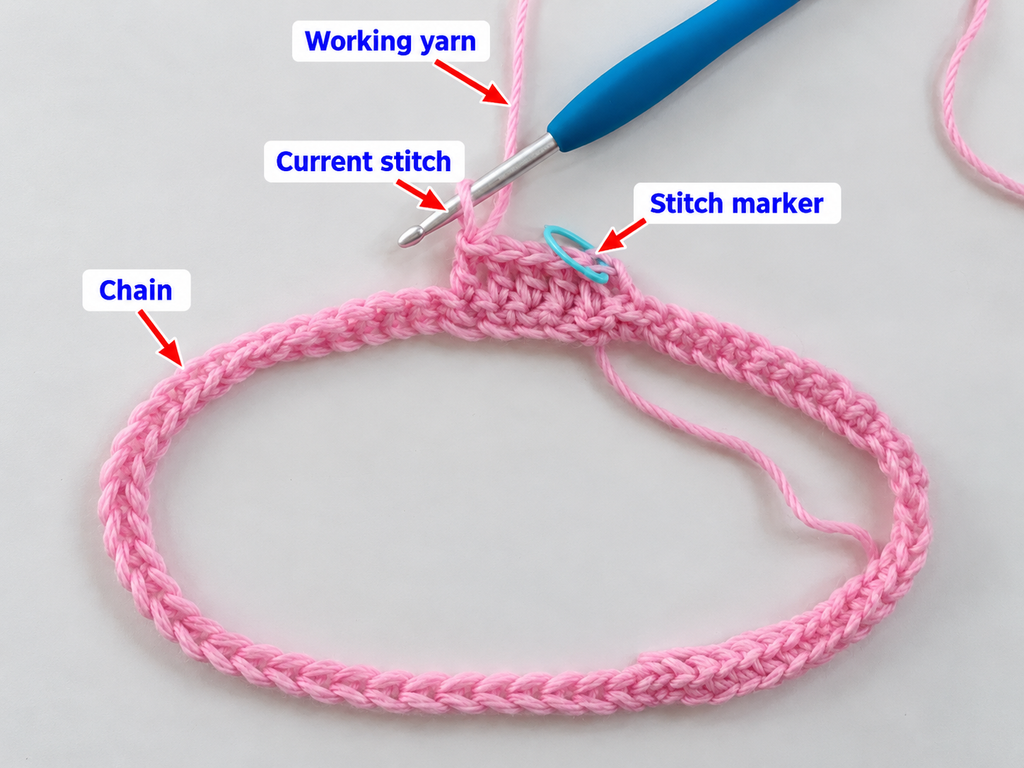
Start by making one chain stitch. This chain gives you the height you need to begin but doesn’t count as a stitch.
Insert your hook into the first foundation chain, at the base of that beginning chain.
Make one single crochet.
Place a stitch marker through the top of this first single crochet.
Continue working one single crochet into every foundation chain around the ring.
As you work, you should notice a neat row of compact stitches forming above your starting chain.
When you reach the end, stop before the marker and count your stitches.
You should have 88 single crochet stitches.
This first round creates a firm but flexible base that helps the cowl hold its shape.
Beginner tip: Move the stitch marker to the new first stitch at the beginning of each round.
Common mistake to avoid: Accidentally skipping a chain near the beginning or end. If you have only 87 stitches, look closely near the join before moving on.
Step 4: Close the First Round Correctly
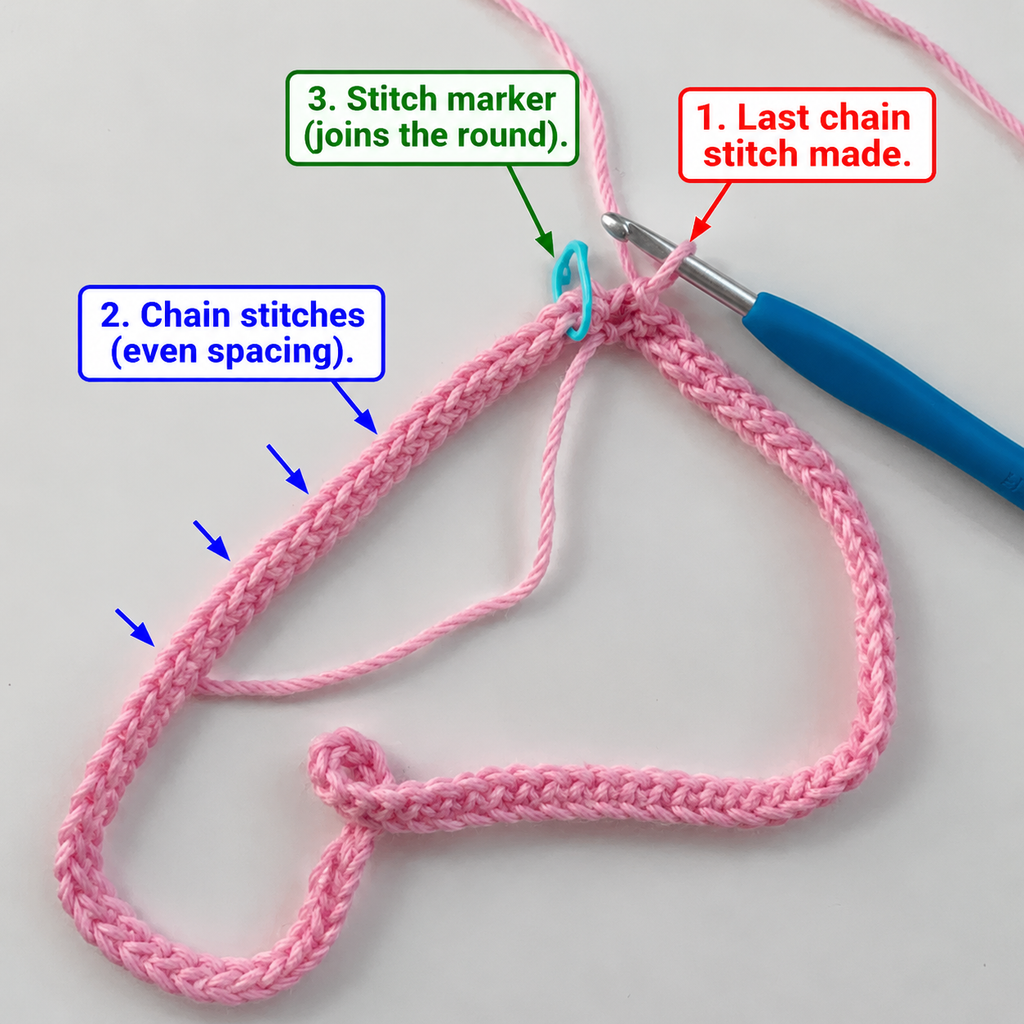
After working your final single crochet, locate the stitch marker you placed in the first stitch.
This marker shows you exactly where to join.
Insert your hook under both top loops of that first single crochet.
Yarn over and pull through the stitch and the loop already on your hook.
This completes the round with a slip stitch.
Don’t work an additional single crochet into the joining space.
Don’t count the slip stitch as a new stitch either.
Now turn your work so that you’re ready to crochet in the opposite direction.
This little finishing action is important because it keeps the round boundaries tidy.
After your first few rounds, joining will begin to feel much more natural.
Beginner tip: If you’re unsure which stitch is the first stitch, move the fabric gently between your fingers and look for the marked V shape.
Common mistake to avoid: Working into the slip stitch on the following round. This accidentally adds stitches and may make the seam slant or the circumference expand.
Step 5: Make the First Double Crochet Round
Your first single crochet round is complete.
Now you’ll introduce the taller stitch that gives this pattern its lovely texture.
With your work turned, chain two.
These two chains provide the starting height for the double crochet round. They do not count as a double crochet.
Yarn over and insert your hook into the first actual stitch, at the base of the chain two.
Pull up a loop, yarn over and pull through two loops, then yarn over and pull through the final two loops.
You’ve completed one double crochet.
Place your stitch marker in the top of this stitch.
Continue working one double crochet into every stitch around the cowl.
As you crochet, the fabric will grow taller much more quickly than it did during the first round.
At the end of the round, count 88 double crochet stitches.
Join with a slip stitch into the top of the first double crochet, then turn your work.
Beginner tip: If you struggle to see the stitch placement, gently stretch the top edge of the fabric sideways with your fingers.
Common mistake to avoid: Treating the beginning chain two as a double crochet. In this pattern, it is only a turning chain, so you still need 88 real double crochet stitches.
Step 6: Work Another Single Crochet Round
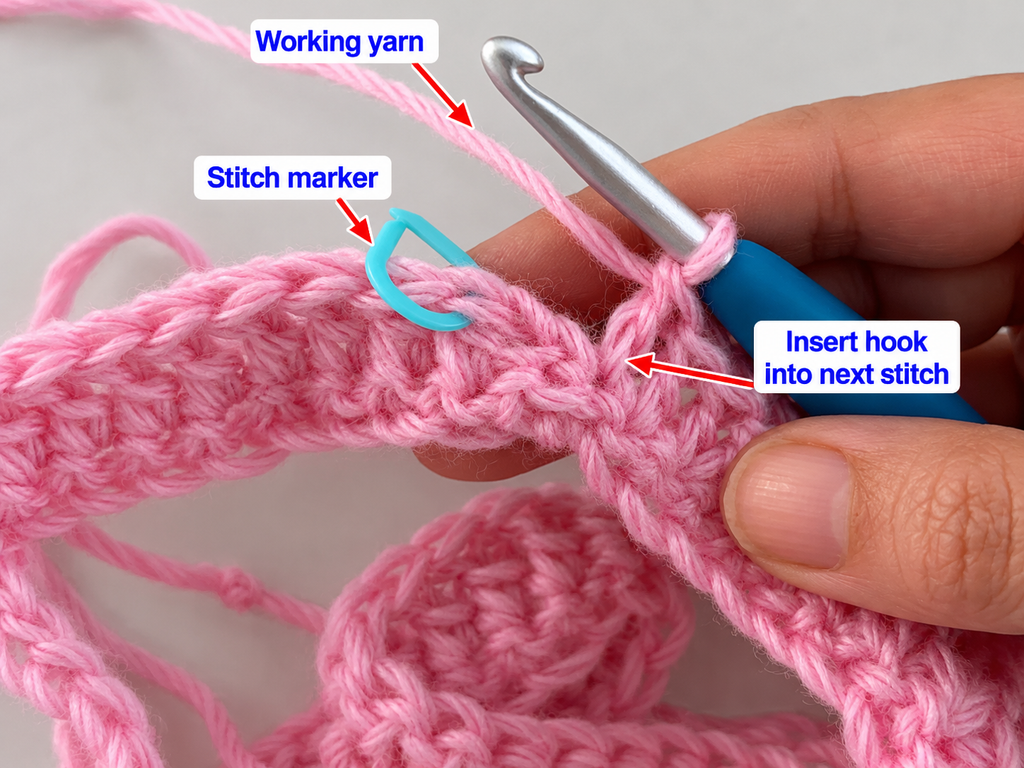
You’ll now return to single crochet.
Chain one to begin.
Insert your hook into the first stitch and make one single crochet.
Mark this stitch if you’re using a stitch marker.
Continue making one single crochet in each double crochet around the ring.
When you finish, you should again have 88 stitches.
Join with a slip stitch to the first single crochet and turn.
Take a moment to look at your work.
You should see the start of a horizontal texture created by the different stitch heights.
The single crochet rounds form shorter, compact sections, while the double crochet rounds form slightly taller sections.
This is the main pattern you’ll repeat for the rest of the cowl.
Beginner tip: Run your fingertips along the fabric. You may find it easier to feel the difference between the stitch heights than to see it at first.
Common mistake to avoid: Inserting your hook between the double crochet posts rather than under the top V loops. Work into the top of each stitch unless your pattern specifically says otherwise.
Step 7: Repeat the Pattern to Grow Your Cowl
You now know everything needed to complete the main body of your cowl.
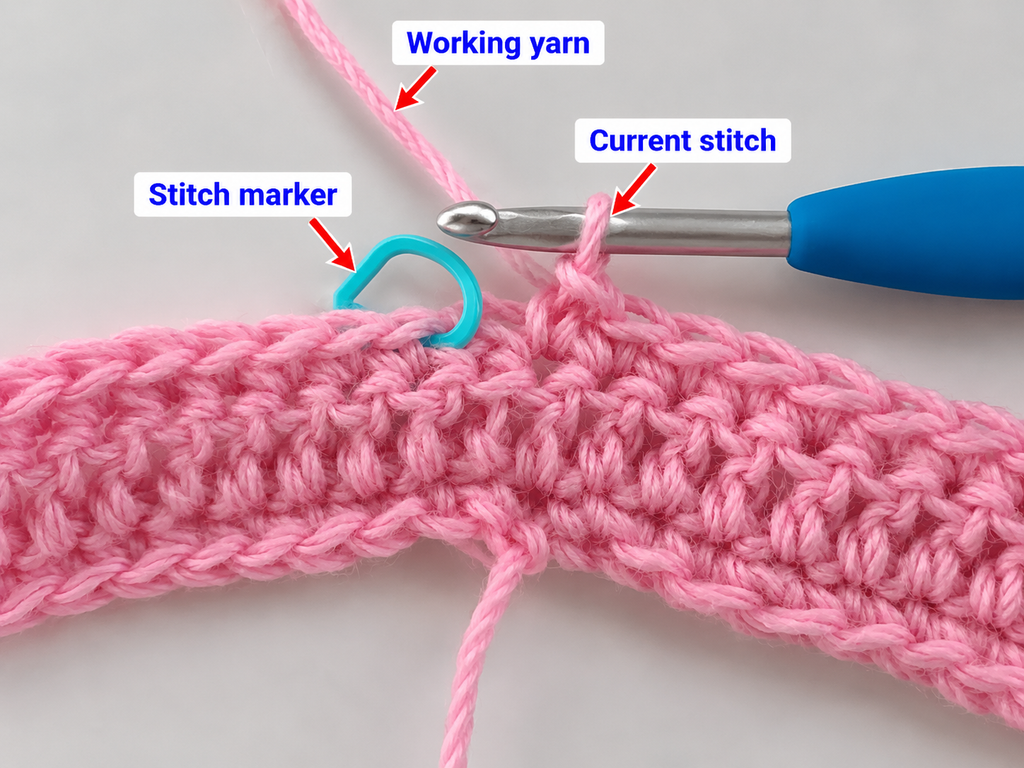
Continue alternating double crochet and single crochet rounds.
For each double crochet round, chain two, work one double crochet into every stitch, join and turn.
For each single crochet round, chain one, work one single crochet into every stitch, join and turn.
The stitch count should remain at 88 throughout.
You don’t need to memorize a complicated stitch sequence or work increases.
Simply alternate between the two stitches.
As the tube gets taller, you can fold part of it down to see how the finished neck warmer will drape.
Try to keep your tension comfortable rather than pulling each stitch extremely tight.
If you enjoy listening to music or watching a television show while crocheting, this is a good stage to relax into the pattern. Just check your stitch count periodically.
Beginner tip: Place a removable marker at the beginning of every fifth round if you’re having trouble keeping track of your progress.
Common mistake to avoid: Changing hook sizes halfway through without intending to. This can make the fabric noticeably tighter or looser.
Step 8: Check the Height and Fit
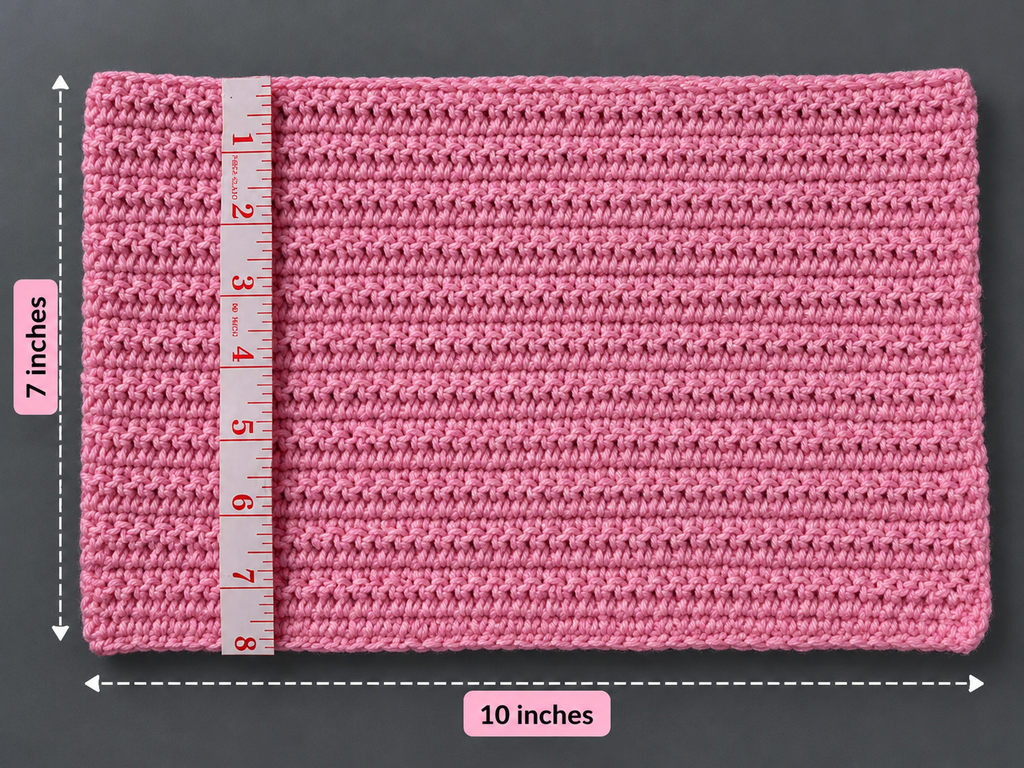
When you’ve worked approximately 18–20 total rounds, pause and measure your fabric.
Lay the cowl flat without stretching it.
Measure from the foundation edge to the current top edge.
For this beginner version, aim for a finished height of about 8–9 inches.
Depending on your yarn, hook, and personal tension, you may need more or fewer rounds.
A deeper cowl creates additional folds around your neck. A shorter cowl sits closer to the neck and feels lighter.
Before you fasten off, carefully slip the unfinished cowl over your head, keeping the hook and working yarn secure.
Check whether it feels comfortable around your neck.
You should be able to move your head freely, and the cowl should not press tightly against your throat.
If you’re happy with the height and fit, finish on a single crochet round so both edges have a neat, compact appearance.
Beginner tip: Prioritize measurements over an exact round count. Your finished cowl should suit you, not just match a number.
Common mistake to avoid: Stretching the fabric while measuring. This makes the cowl appear larger than it will be when worn.
Step 9: Finish the Last Round
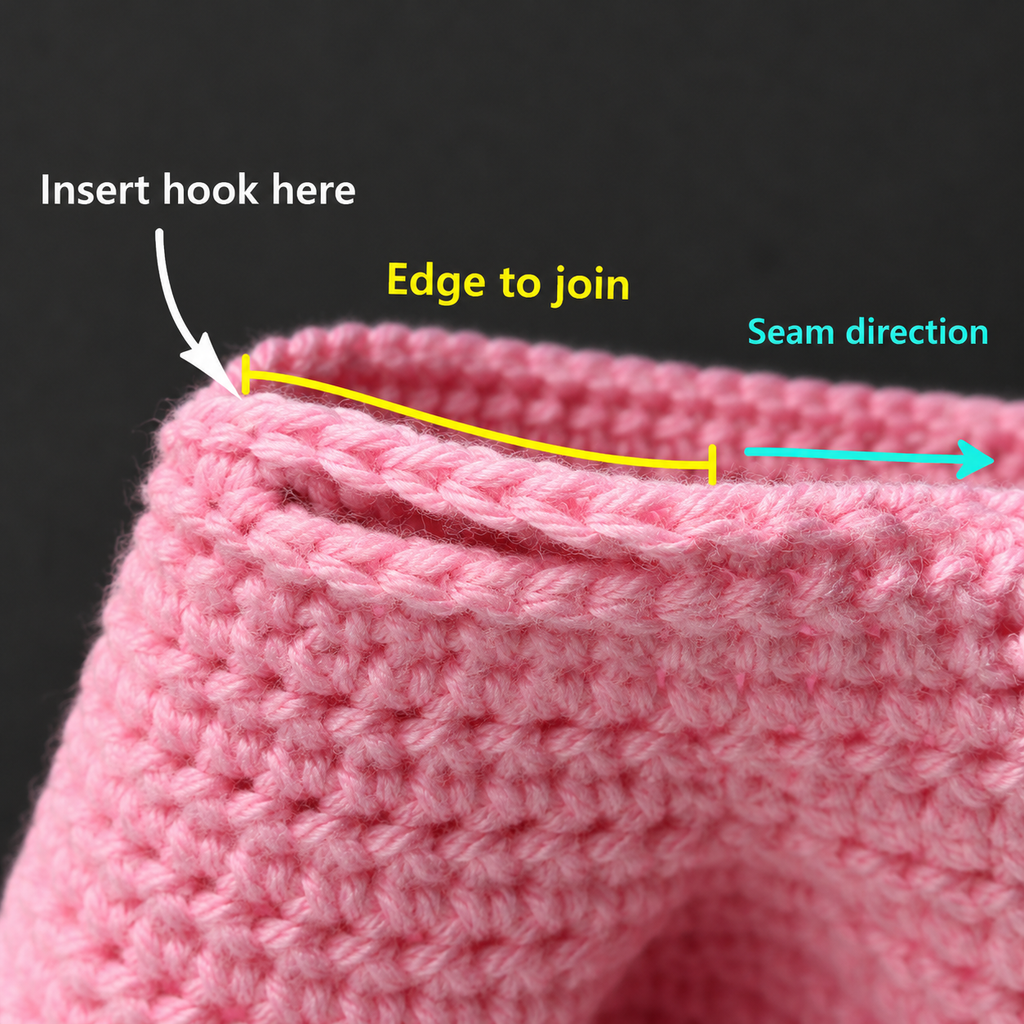
When your cowl has reached its desired height, work your final single crochet round.
Join to the top of the first single crochet with a slip stitch, just as you did in the earlier rounds.
Cut your yarn, leaving a tail approximately 6–8 inches long.
Yarn over and pull the cut end completely through the remaining loop on your hook.
Gently tighten the tail to secure it.
Your crocheting is now complete.
If the join looks slightly noticeable, don’t worry. Once the yarn ends are woven in and the cowl is worn, a small join line is usually much less visible.
Beginner tip: Leave a generous yarn tail for weaving rather than trimming close to the fabric.
Common mistake to avoid: Cutting the tail immediately beside the last stitch. A short tail can be difficult to secure properly.
Step 10: Weave in Your Yarn Ends
Thread your yarn tail through a blunt tapestry needle.
Turn the cowl so the side you prefer as the inside faces outward.
Carefully weave the tail through the backs of several neighboring stitches.
Follow the direction of the existing yarn path where possible.
Change direction once or twice to help secure the end.
Make sure you’re not pulling so tightly that the fabric bunches together.
Once the tail is secure, trim the remaining yarn close to the fabric without cutting any stitches.
Repeat with the yarn tail left from the foundation chain.
Your crochet cowl is now ready for its final shaping.
Beginner tip: Stretch the fabric gently after weaving in each end. This helps the stitches relax into their natural shape.
Common mistake to avoid: Weaving yarn ends in a straight line through large, loose spaces. They may become visible or work loose with wear.
Crochet Cowl Pattern Notes
Before moving on to customization and finishing, here are a few important details to remember.
Turning chain rules
The beginning chain of each round does not count as a stitch.
For single crochet rounds, begin with chain one.
For double crochet rounds, begin with chain two.
Always make the first actual stitch in the first stitch of the previous round, at the base of your turning chain.
This maintains the correct stitch count.
Stitch count
Every round should contain 88 stitches when following the standard version.
If you modify your starting chain, your new chain count becomes your stitch count for all subsequent rounds.
The pattern does not require a particular multiple, because every round contains one stitch worked into each stitch below.
Repeat pattern
Once the foundation and first single crochet round are finished, the repeat is simple:
Double crochet round → Single crochet round → Repeat.
Keep alternating until your cowl reaches your preferred height.
Right side and wrong side
Since this cowl is worked in turned rounds, both sides have a wearable appearance.
You can choose whichever side of the fabric you prefer to face outward.
The main thing is to remain consistent with the turning instructions rather than switching between turned and unturned rounds halfway through the project.
Size adjustment notes
To make your cowl wider, add chains to the foundation.
To make it smaller, remove chains, ensuring the finished opening passes comfortably over the wearer’s head.
To make your cowl taller, work additional repeats.
To make it shorter, finish the project earlier, ideally after a single crochet round.
Remember that changing the yarn weight or hook size will also affect the overall dimensions.
Common Beginner Crochet Cowl Mistakes
Even a simple crochet cowl can come with a few learning moments. Most problems are easy to fix once you know what to look for.
1. Twisting the foundation chain
Problem: The bottom edge of the cowl develops an unintended twist.
Why it happens: A section of the foundation chain rolled over before the ends were joined.
Fix: Check the full chain before making your slip stitch join. If you spot a twist during the first round, undo the work back to the joining point and straighten it.
2. Accidentally adding stitches
Problem: Your cowl gradually becomes wider as you work.
Why it happens: You may be crocheting into the joining slip stitch or counting the turning chain as an additional stitch.
Fix: Keep a marker in your first actual stitch. Count 88 stitches before completing each round.
3. Tight starting chain
Problem: The bottom edge pulls inward while the upper part of the fabric appears wider.
Why it happens: The foundation chain is tighter than the rest of the crochet.
Fix: Try making the starting chain with a hook one size larger than the hook used for the body.
4. Uneven tension
Problem: Some stitches look noticeably larger than others.
Why it happens: Your yarn tension changes while crocheting.
Fix: Hold your yarn in a comfortable, repeatable way. Avoid pulling each stitch tight after completing it.
5. Losing track of the round
Problem: You’re unsure whether the next round should be single crochet or double crochet.
Why it happens: The repeating pattern is easy to forget when you put your work down.
Fix: Keep a simple written round tracker and tick off each completed round.
6. Joining into the wrong stitch
Problem: The round join looks messy or gradually moves across the fabric.
Why it happens: You’re inserting the hook into a turning chain or joining slip stitch.
Fix: Use a marker to identify the top of the first actual stitch of each round.
7. Making the cowl too narrow
Problem: The finished cowl feels uncomfortable or is difficult to put on.
Why it happens: The foundation chain was too short, or the chosen yarn has little stretch.
Fix: Check the fit of the starting chain before joining. The circumference should allow the cowl to pass over the head comfortably without forcing or excessive stretching.
How to Customize This Crochet Cowl Pattern
One of my favorite things about a simple cowl design is how easily it can become your own.
You can change the yarn, colors, height, texture, or finishing details without needing to learn a completely new project.
Try different yarns
For a cozy winter version, choose a soft wool blend.
For a lightweight transition-season accessory, try a breathable cotton blend.
An acrylic yarn works well for everyday wear and is often easier to care for.
If you use a different yarn weight, make a small gauge swatch and recalculate your starting chain rather than automatically using 88 chains.
Add color changes
A two-color version can look especially beautiful with this stitch pattern.
Try one muted shade for the single crochet rounds and a complementary shade for the double crochet rounds.
You could combine sage green and cream, dusty rose and oatmeal, or charcoal and soft gray.
For a simpler approach, use a self-striping yarn that changes color naturally as you crochet.
Make a taller cowl
If you prefer a cowl that can bunch around your neck, add several more rounds.
A height of 10–12 inches creates a deeper accessory with additional folds.
The exact number of rounds depends on your gauge.
Add a simple decorative border
The basic design already has tidy edges, but you can add a small finishing detail.
For a subtle decorative border, work one additional round of single crochet around the upper edge.
You could also experiment with reverse single crochet for a more defined cord-like finish, although that technique is better suited to crocheters who have practiced a little longer.
Avoid tight borders that reduce the opening circumference.
Create a different texture
Once you’ve completed your first cowl, experiment with other beginner-friendly stitch combinations.
Half double crochet can create a smoother fabric, while working selected stitches in the back loop can produce more visible ridges.
Keep in mind that these changes affect gauge and may require you to adjust the starting chain or number of rounds.
Turn it into a matching gift set
A handmade crochet cowl makes a lovely gift on its own.
You can also create a coordinated set with a crochet ear warmer, beanie, or pair of fingerless gloves.
Using the same yarn color across all the pieces gives the set a thoughtful, coordinated appearance.
Finishing Instructions
After weaving in the yarn tails, gently arrange the cowl on a flat surface.
Smooth the fabric with your hands and make sure the upper and lower edges are relaxed rather than stretched.
If your yarn benefits from blocking, follow the yarn manufacturer’s washing instructions.
For a washable fiber, you may be able to wet the cowl gently, squeeze out excess water without wringing, and lay it flat on a clean towel to dry.
For wool or other delicate fibers, check the care label first.
Blocking can help improve stitch definition, soften uneven tension, and give the finished cowl a more polished appearance.
Avoid aggressively stretching the fabric, particularly around the opening.
Once the cowl is completely dry, slip it over your head and arrange the fabric around your neck.
You can leave it standing slightly upright for extra warmth or fold it gently for a softer, more relaxed look.
The final result should feel comfortable, soft, and easy to wear.
Quick Printable-Style Crochet Cowl Pattern Summary
Easy Textured Crochet Cowl
ORIGINAL BEGINNER PATTERN · US CROCHET TERMS
Skill level: Beginner
Materials: Approximately 200–250 yards of #4 worsted yarn, 5.5 mm hook, scissors, stitch marker, measuring tape, yarn needle.
Finished size: Adjustable; target approximately 27–29 inches circumference and 8–9 inches high.
Stitches: ch, sc, dc, sl st.
Important: Turning chains do not count as stitches. Join each round to the first actual stitch, then turn.
Foundation: Ch 88. Join with sl st to the first chain without twisting.
Round 1: Ch 1, sc in each foundation chain around. Sl st to first sc, turn. (88 sc)
Round 2: Ch 2, dc in each stitch around. Sl st to first dc, turn. (88 dc)
Round 3: Ch 1, sc in each stitch around. Sl st to first sc, turn. (88 sc)
Rounds 4 onward: Repeat Rounds 2 and 3, alternating dc and sc rounds, until the cowl measures approximately 8–9 inches tall. End after a single crochet round.
Finishing: Join final round, fasten off, weave in tails, shape gently and block if appropriate.
Sizing note: Check the circumference of the starting chain and the height as you work. The starting count, yarn estimate and finished dimensions are intended targets rather than tested sample specifications.
Copy printable pattern
Frequently Asked Questions About Crochet Cowl Patterns
1. Is a crochet cowl easy for beginners?
Yes. A basic crochet cowl is an excellent beginner wearable project because you don’t need complicated shaping or garment construction.
This pattern uses chain, single crochet, double crochet, and slip stitch.
The most important skills are maintaining an even stitch count, joining rounds correctly, and checking your measurements.
2. How much yarn do I need for a crochet cowl?
For this version, plan for approximately 200–250 yards of worsted-weight yarn.
Your actual yarn consumption will depend on the circumference, height, stitch tension, and fiber.
If you want an oversized cowl, buy additional yarn from the same dye lot when possible.
3. What is the best crochet stitch for a cowl?
Single crochet and double crochet are both excellent choices.
Single crochet creates a denser fabric, while double crochet creates more height and drape.
Alternating the two gives you a textured fabric without making the project unnecessarily difficult.
Half double crochet is another popular beginner-friendly choice.
4. How wide should a crochet cowl be?
For a comfortable adult one-loop cowl, a circumference of approximately 26–30 inches is a useful starting range, depending on the wearer and desired fit.
Make sure the opening passes comfortably over the head.
A wider circumference creates a looser look, while a smaller circumference gives a closer fit.
5. Can I make a crochet cowl without sewing?
Absolutely.
This tutorial is worked directly in joined rounds, so the fabric forms a tube as you crochet.
There is no main seam to sew at the end.
You’ll only need a yarn needle to weave in the loose ends.
6. Can I use bulky yarn instead of worsted yarn?
Yes, but you’ll need to adjust the pattern.
Bulky yarn produces larger stitches and may require fewer starting chains to achieve the same circumference.
Choose an appropriate hook size for your yarn, then measure the foundation chain before joining.
You may also need fewer rounds to reach the desired height.
7. What is the difference between a crochet cowl and an infinity scarf?
A crochet cowl is generally a shorter loop that sits around the neck, usually worn without wrapping multiple times.
An infinity scarf is often longer and designed to be looped around the neck two or more times.
Both can be crocheted in rounds or made from a flat piece joined at the ends.
Conclusion
A crochet cowl doesn’t need complicated stitches or intricate shaping to look beautiful.
Sometimes, the simplest patterns create the accessories you reach for most often.
With just a few basic crochet techniques and your favorite soft yarn, you can make a cozy neck warmer that’s practical, comfortable, and easy to customize.
Once you’ve completed this beginner crochet cowl, try making another in a different color or yarn blend. You might be surprised how much a small change can transform the finished look.
Save this easy crochet cowl pattern for your next relaxing crochet session, or make one as a thoughtful handmade gift for someone who loves warm winter accessories.